'%20/%3e%3c!--%20Clock%20face%20--%3e%3ccircle%20cx='32'%20cy='33'%20r='19'%20fill='%23ffffff'%20/%3e%3c!--%20Hour%20ticks%20--%3e%3cg%20fill='%231d4ed8'%3e%3crect%20x='31'%20y='16'%20width='2'%20height='4'%20rx='1'%20/%3e%3crect%20x='31'%20y='46'%20width='2'%20height='4'%20rx='1'%20/%3e%3crect%20x='15'%20y='32'%20width='4'%20height='2'%20rx='1'%20/%3e%3crect%20x='45'%20y='32'%20width='4'%20height='2'%20rx='1'%20/%3e%3c/g%3e%3c!--%20Hour%20hand%20(blue)%20pointing%20to%20~4%20--%3e%3cline%20x1='32'%20y1='33'%20x2='42'%20y2='41'%20stroke='%231d4ed8'%20stroke-width='3.2'%20stroke-linecap='round'%20/%3e%3c!--%20Minute%20hand%20(green%20accent)%20pointing%20to%2012%20--%3e%3cline%20x1='32'%20y1='33'%20x2='32'%20y2='19'%20stroke='%2310b981'%20stroke-width='3.2'%20stroke-linecap='round'%20/%3e%3c!--%20Center%20pin%20--%3e%3ccircle%20cx='32'%20cy='33'%20r='2.4'%20fill='%2310b981'%20/%3e%3c/svg%3e)
User Guide
Everything you need to know about using blogti.me to track your time.
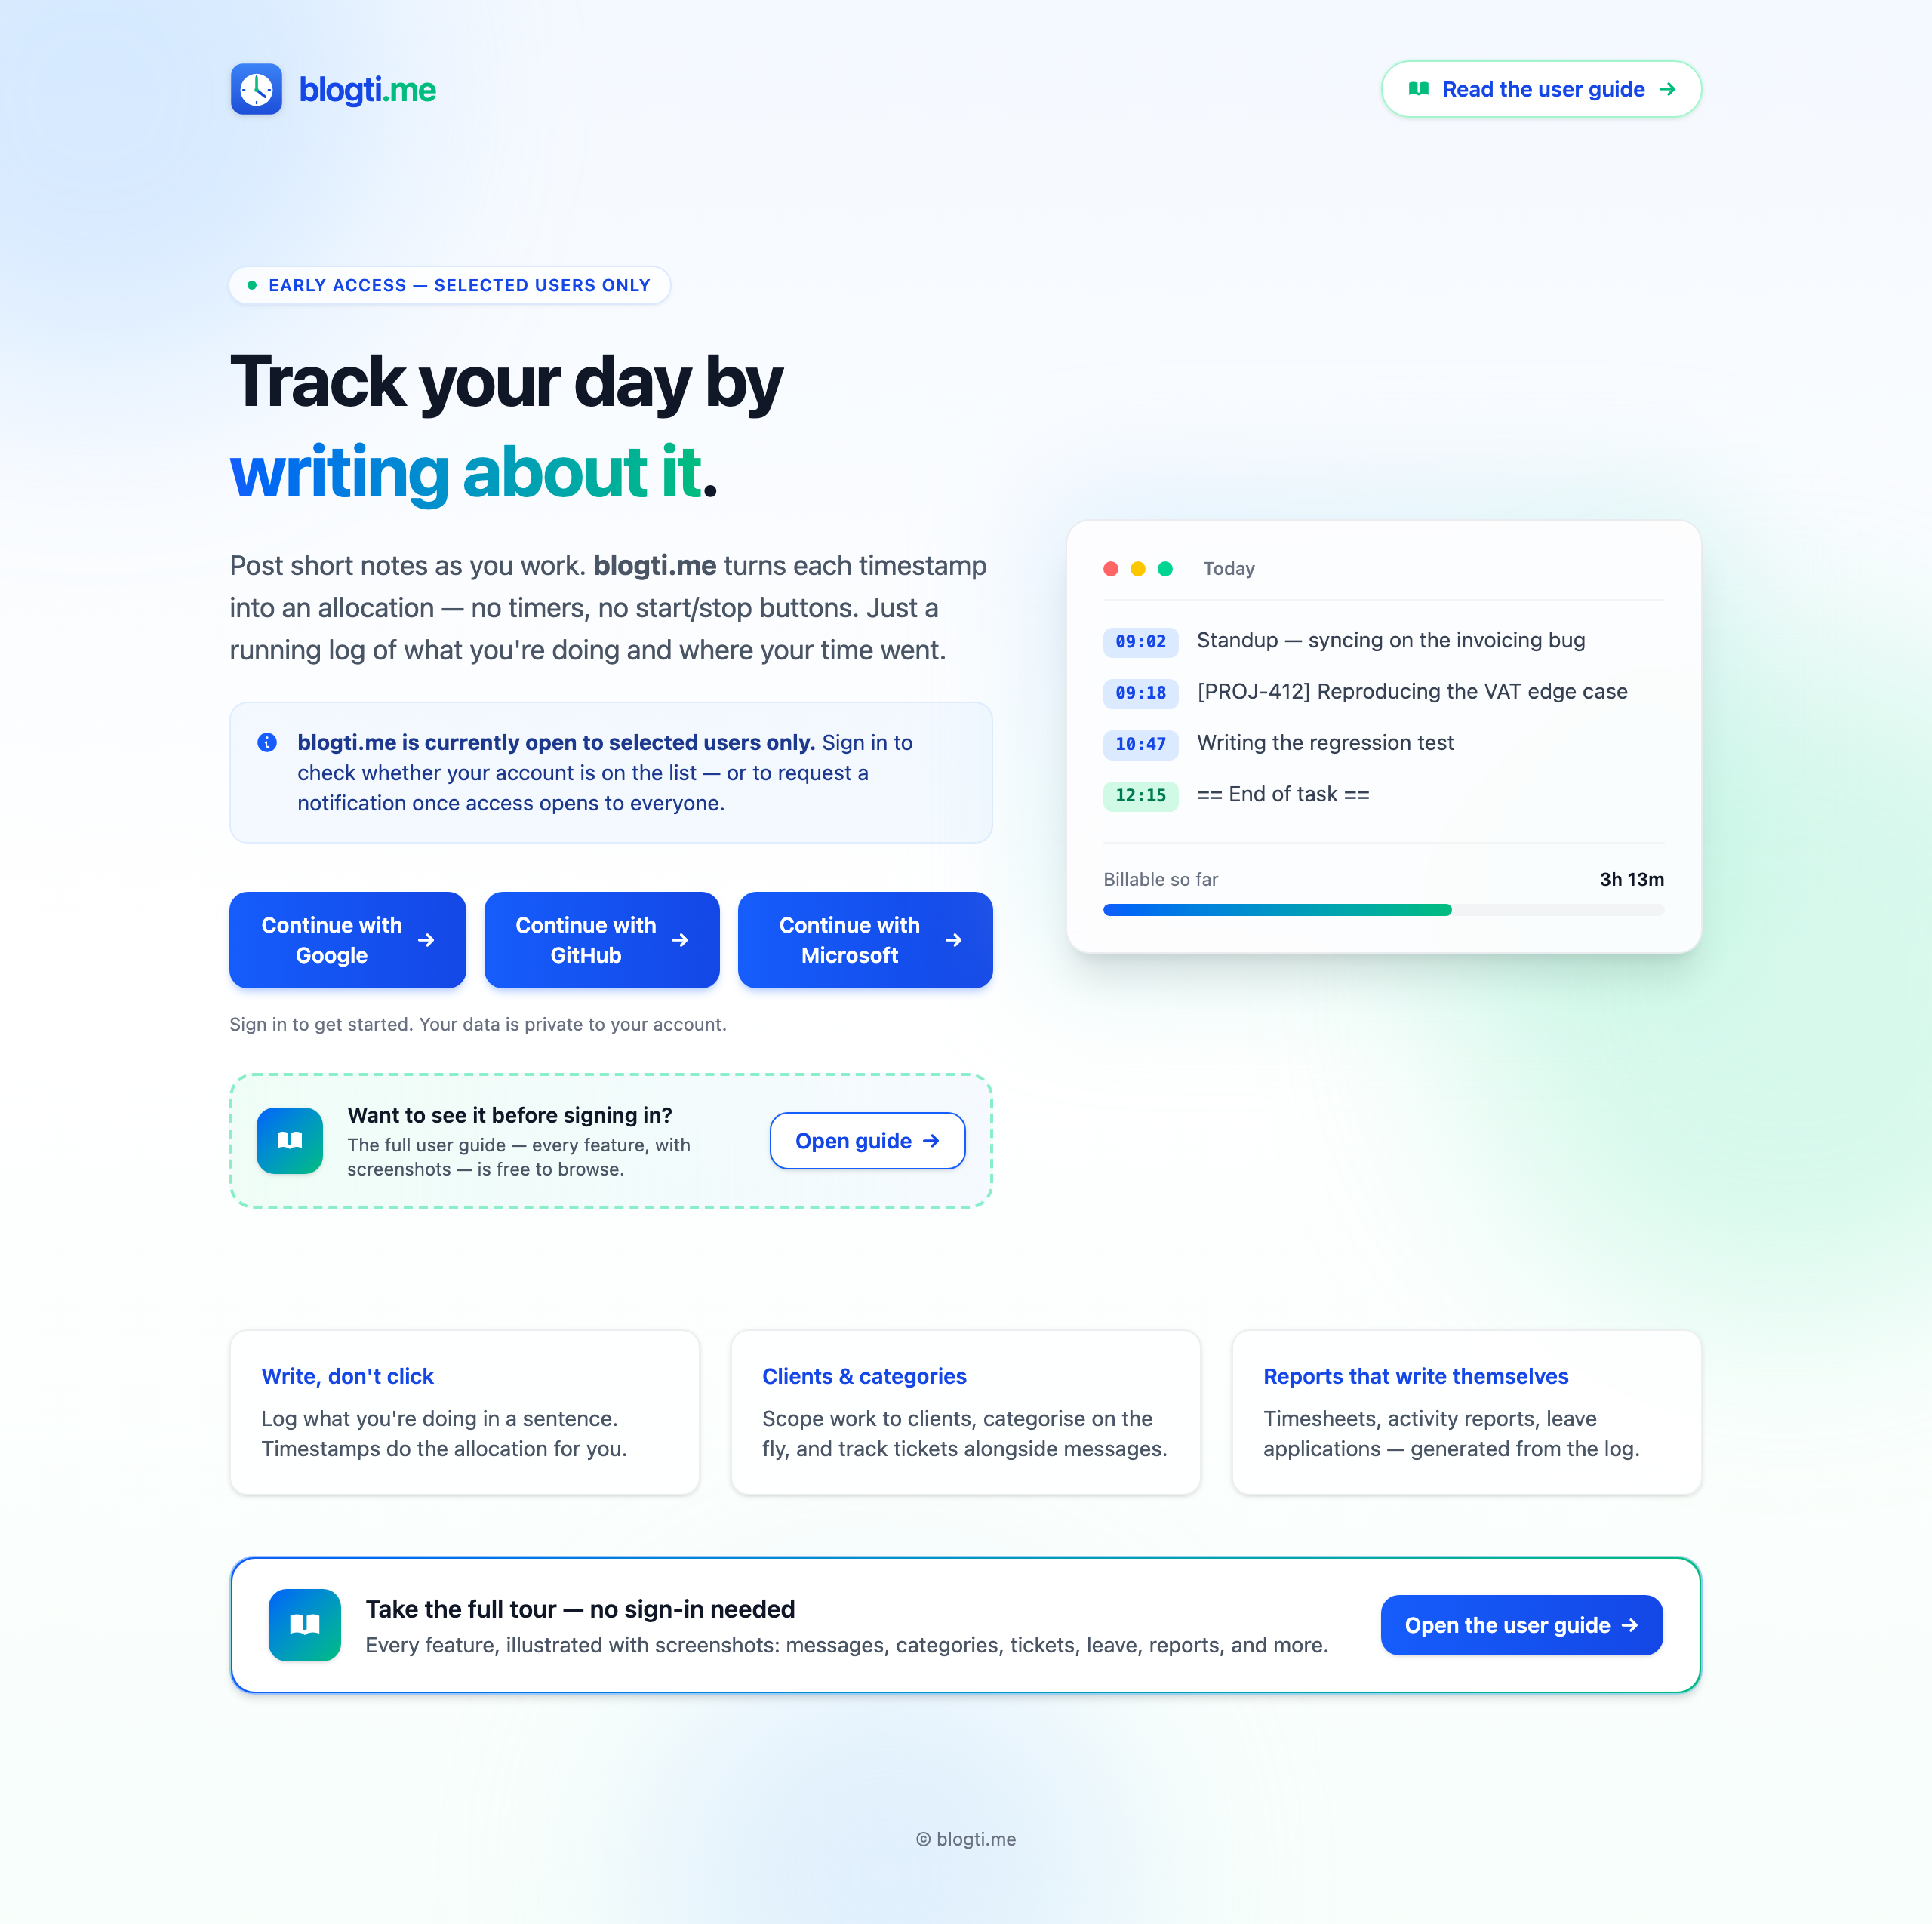
blogti.me takes a journal-style approach to time tracking. Instead of starting and stopping timers, you post short messages describing what you're working on. The timestamp of each message marks the start of that activity, and the gap between messages becomes the tracked duration.
Getting Started
Signing In
Open blogti.me in your browser. You'll see sign-in options for Google, GitHub, and Microsoft. Click your preferred provider and authorise the app. Your sign-in creates a private account — all your data is only visible to you.
No account yet? This guide itself is public — every section below is browsable without signing in. Use the User Guide link on the landing page (and the prominent "Take the full tour" banner) to come back here later.
Your First Client
After signing in, create a client to start tracking time. A client represents a company, project, or engagement. Head to Configuration > Clients and add one.
The Header
The header appears on every page. It contains the logo, the client selector, sync status, your user menu, and the dark mode toggle. The navigation tabs below let you switch between features.

The header shows the selected client, navigation tabs (Day View, Summary, Month Notes, Tickets, Leave, Reminders, Reports, Configuration, Guide), sync status, user avatar, and theme toggle. The Configuration tab opens a sub-tab layout with General, Clients, Categories, Work Schedule, Leave, and Holidays.
Switching Clients
Use the Client dropdown in the header to switch between clients. Everything on screen — messages, categories, leave data, reports — is scoped to whichever client is selected. Only active clients appear in the dropdown.
Day View
The Day View is the main screen — where you log messages and review how your time is being spent.
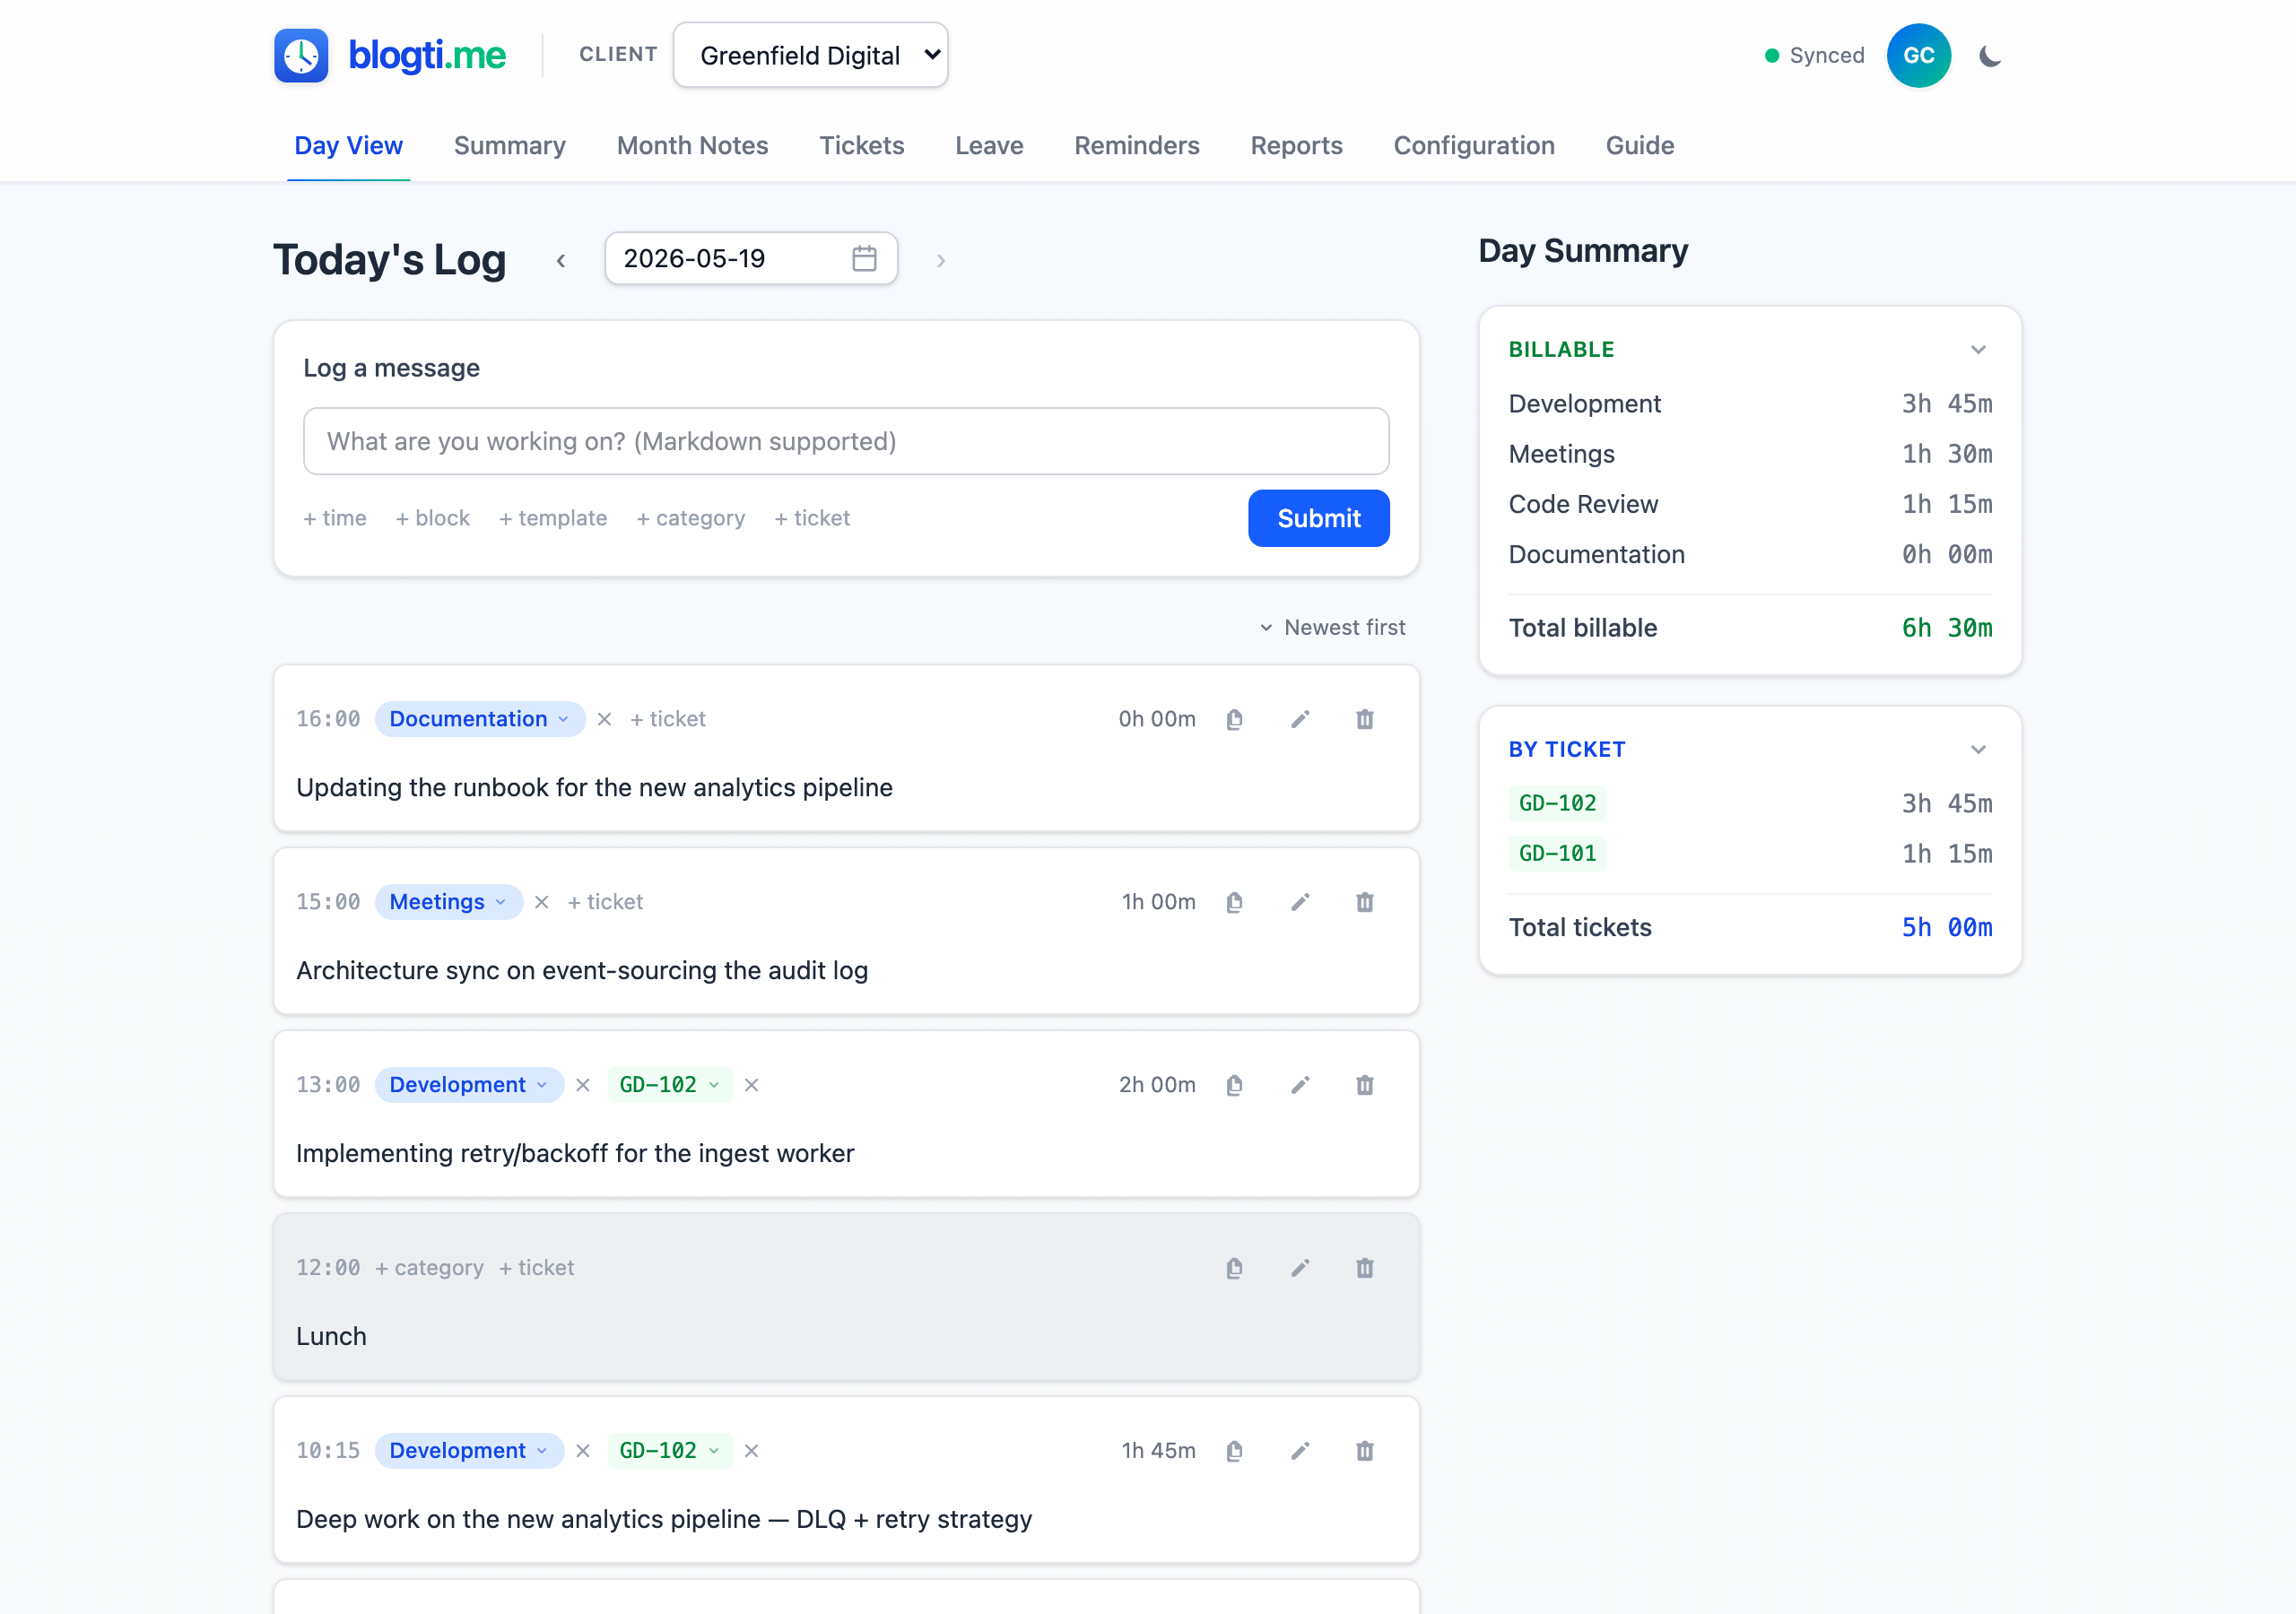
Posting a Message
Type a description of what you're about to work on and click Submit (or press Enter). The current time is automatically recorded as the start of the activity. Messages support multi-line text and Markdown formatting.
Quick-add Links
Below the message input, you'll see optional links for adding extra detail before submitting:
| Link | What it does |
|---|---|
| + time | Set a custom timestamp instead of "right now" |
| + block | Enable block booking mode |
| + category | Pre-assign a category before submitting |
| + ticket | Pre-assign a ticket before submitting |
| + template | Fill the form from a saved message template |
| reset | Clear the entire form (appears when any field has input) |
Overriding the Time
Click + time to open a time picker. Use this when logging something after the fact — enter the time you actually started. When posting to a past date, a time is always required.
Block Booking
Block booking records a completed chunk of work in one step:
- Click + block in the more… menu to open the block panel.
- Pick an input mode with the toggle — Start + end or Start + duration (your choice is remembered).
- Enter the times (the start is pre-filled with the current time on today).
- Add your message text, category, ticket, and/or tags.
- Submit — the panel previews the resolved span as you type.
This creates two messages: your start message and an automatic "End of task" marker. The time between them is attributed to your chosen category. If the client has a default block-booking category set (on the Configure panel), it's pre-selected when you open block mode. Block bookings are rejected if any existing message falls within the time range, if the duration is zero or the end is not after the start, or if the span extends past midnight.
Assigning Categories and Tickets
Every message can be tagged with a category and optionally a ticket. Assign them before submitting (via + category / + ticket) or after the fact from each message card.
The dropdowns show a Recent section (your 5 most recently used) followed by all items alphabetically. With 6+ items, a search box appears — type to filter, press Enter to pick the first match. Use + New category... or + New ticket... to create on the fly without leaving the Day View.
Messages without a category don't count toward time totals. Message cards are colour-coded: green for billable, gray for non-billable, and white for uncategorised.
Copy a Message Back to the Form
Each message card has a small copy-to-form icon button. Click it to push that message's content, category, and ticket up into the new-message form so you can post a fresh entry with the same particulars (the timestamp is intentionally left blank). Works on any unlocked date — on today the new entry takes the current time; on past or future dates you'll need to pick a custom time before posting. The button fades to 20% opacity and disables itself when the form already matches that message — a passive indicator that the row is already mirrored above.
Day Summary
The sidebar shows where your time went: billable categories, non-billable categories, and a ticket breakdown. Each section is collapsible — the total stays visible when collapsed. Your collapse preferences persist across sessions.
Navigating Between Days
Use the date navigation at the top to move between days. The app defaults to today. Navigate to any past date to review the log, add backdated messages, or reassign categories.
Day Summary
The Summary tab is a totals-only view of a single day — no message list, no editing. It's the screen to pull up when you just want to see where the day went.
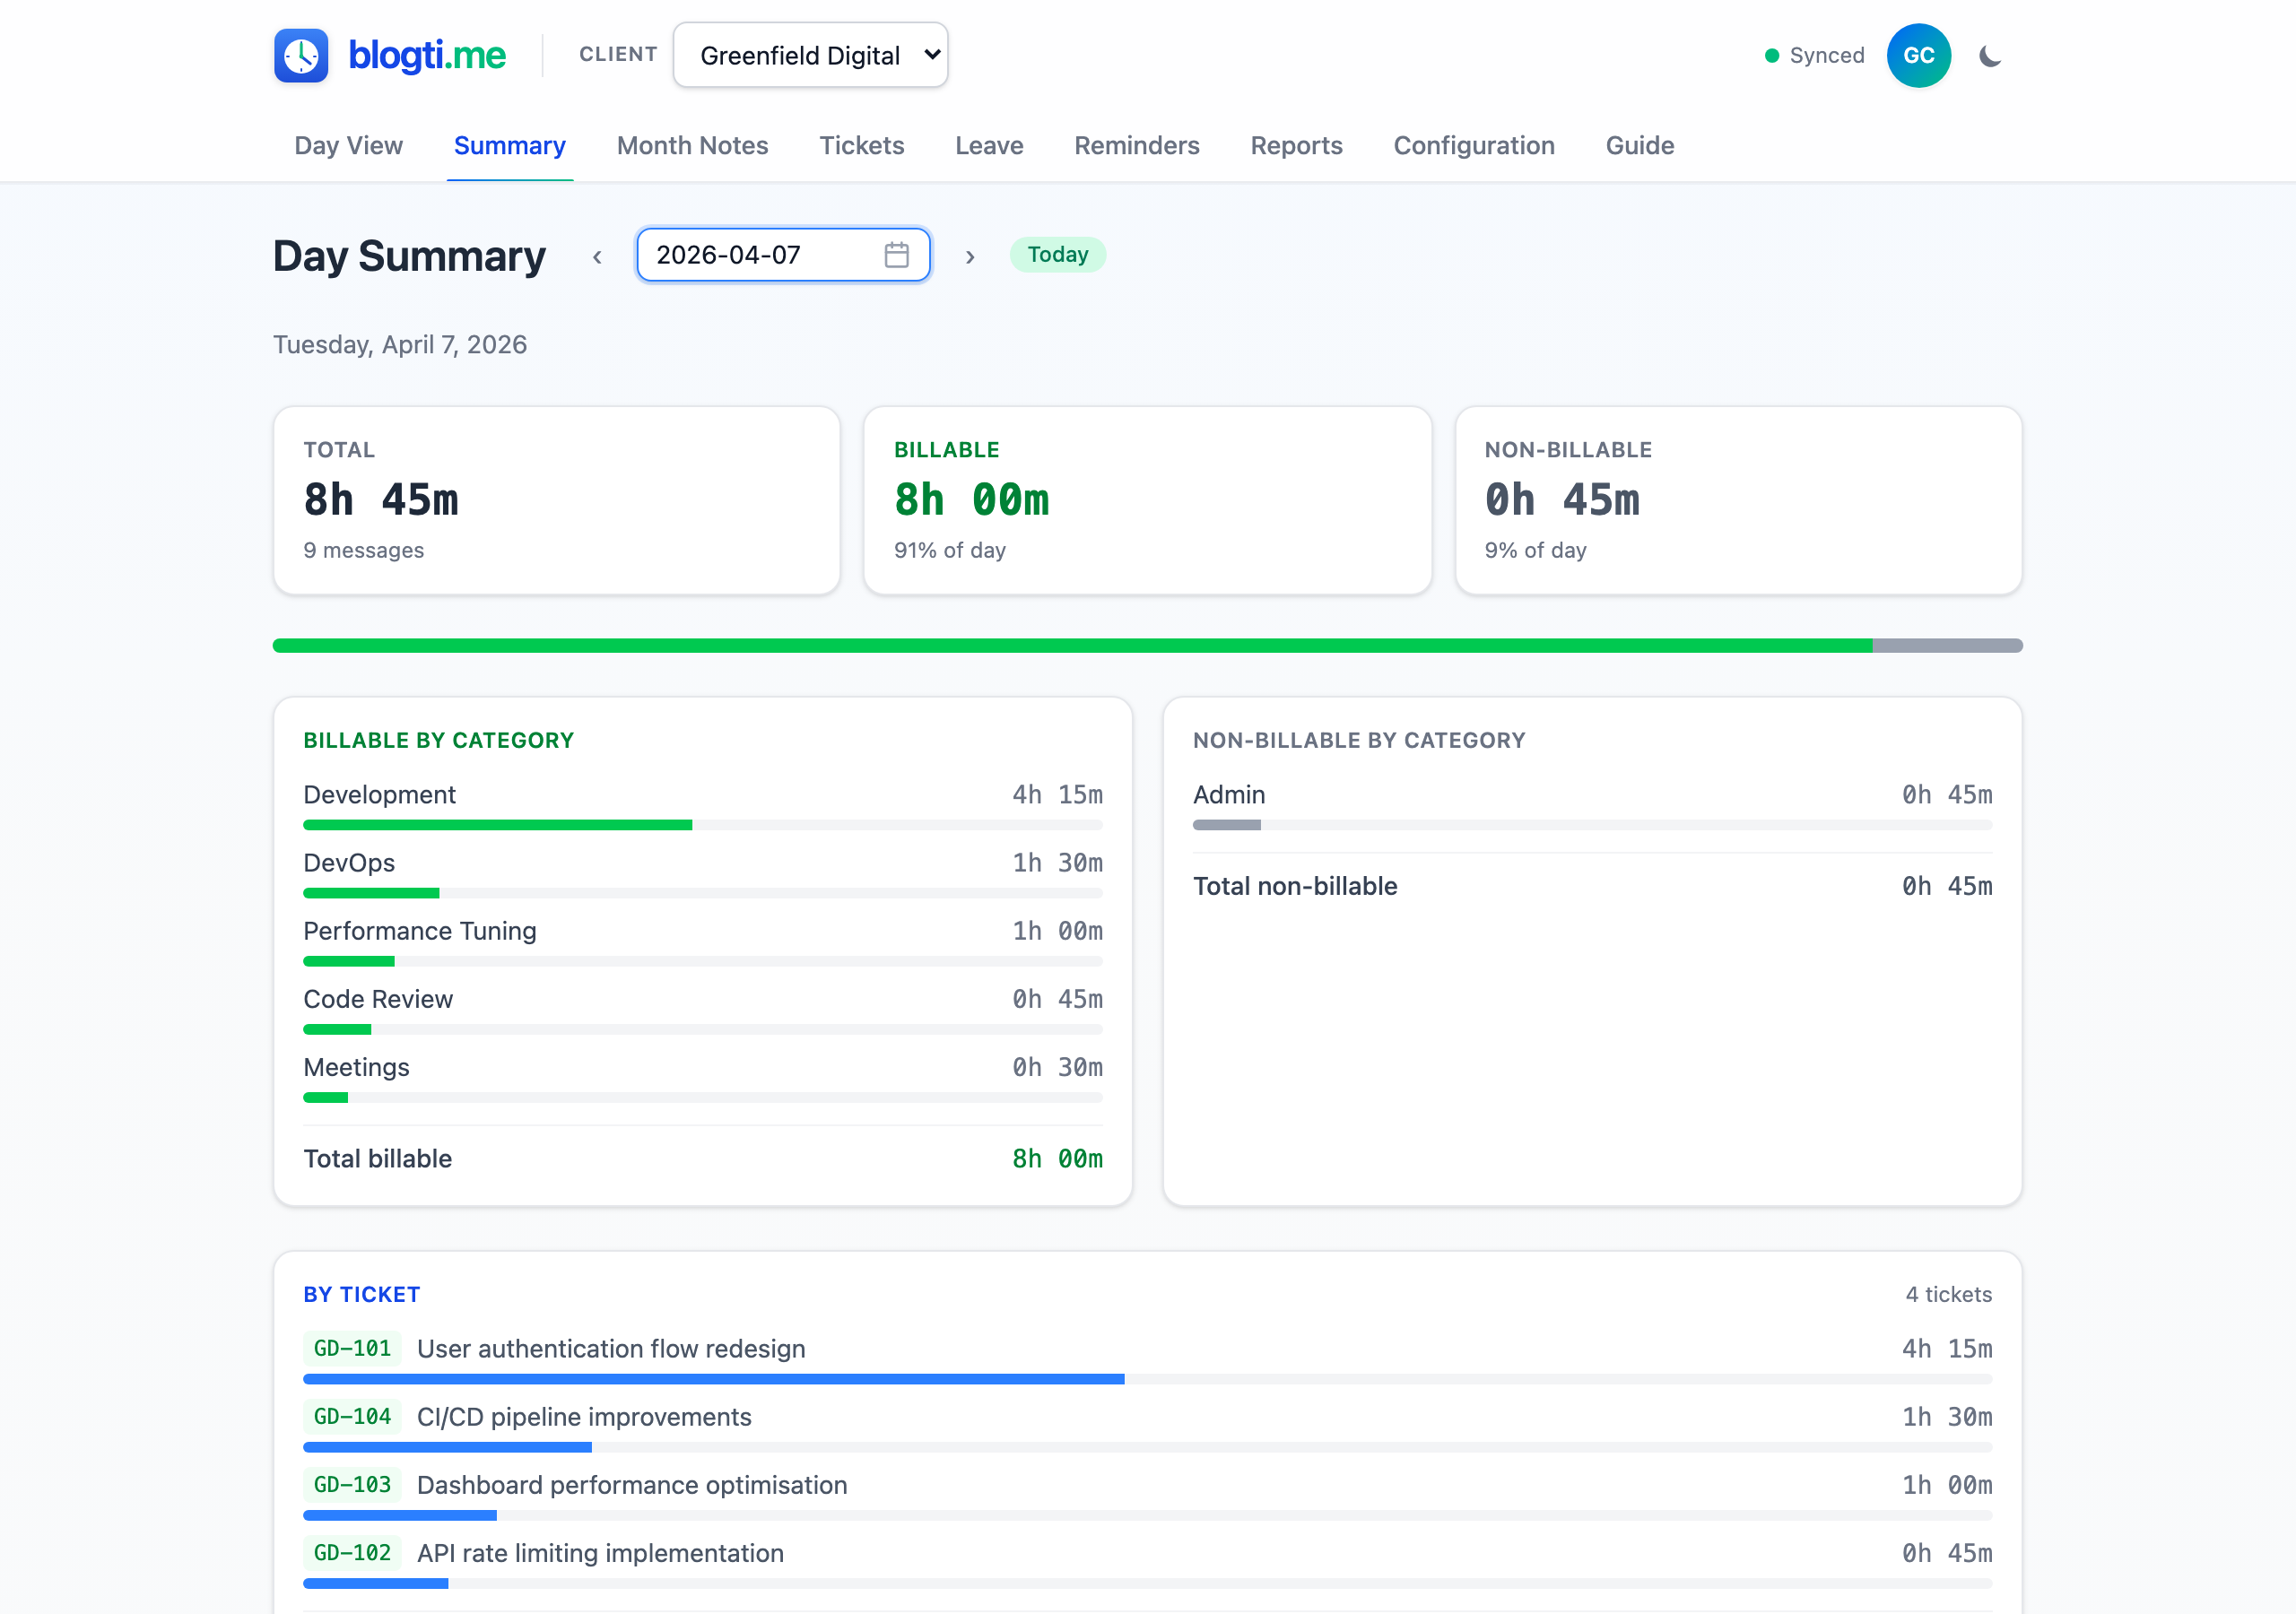
Picking a Day
The page defaults to today. Use the prev/next arrows or the date picker to jump to any past day; a Today pill appears whenever you're viewing a different date so you can snap back in one click.
What You See
- Three headline cards — Total time, Billable (with % of day), Non-billable (with % of day).
- A stacked bar showing the billable vs non-billable split at a glance.
- Billable by category and Non-billable by category breakdowns, each line with a mini-bar proportional to the day's total.
- By ticket: per-ticket totals plus an Not linked to a ticket remainder line so uncovered time is never hidden.
Live Updates
When you're viewing today, totals refresh every 10 seconds so the last message's running allocation stays current.
Categories
Categories classify your work — things like "Development", "Code Review", "Meetings", or "Annual Leave". Each category belongs to a specific client. Navigate to Configuration > Categories to manage them.
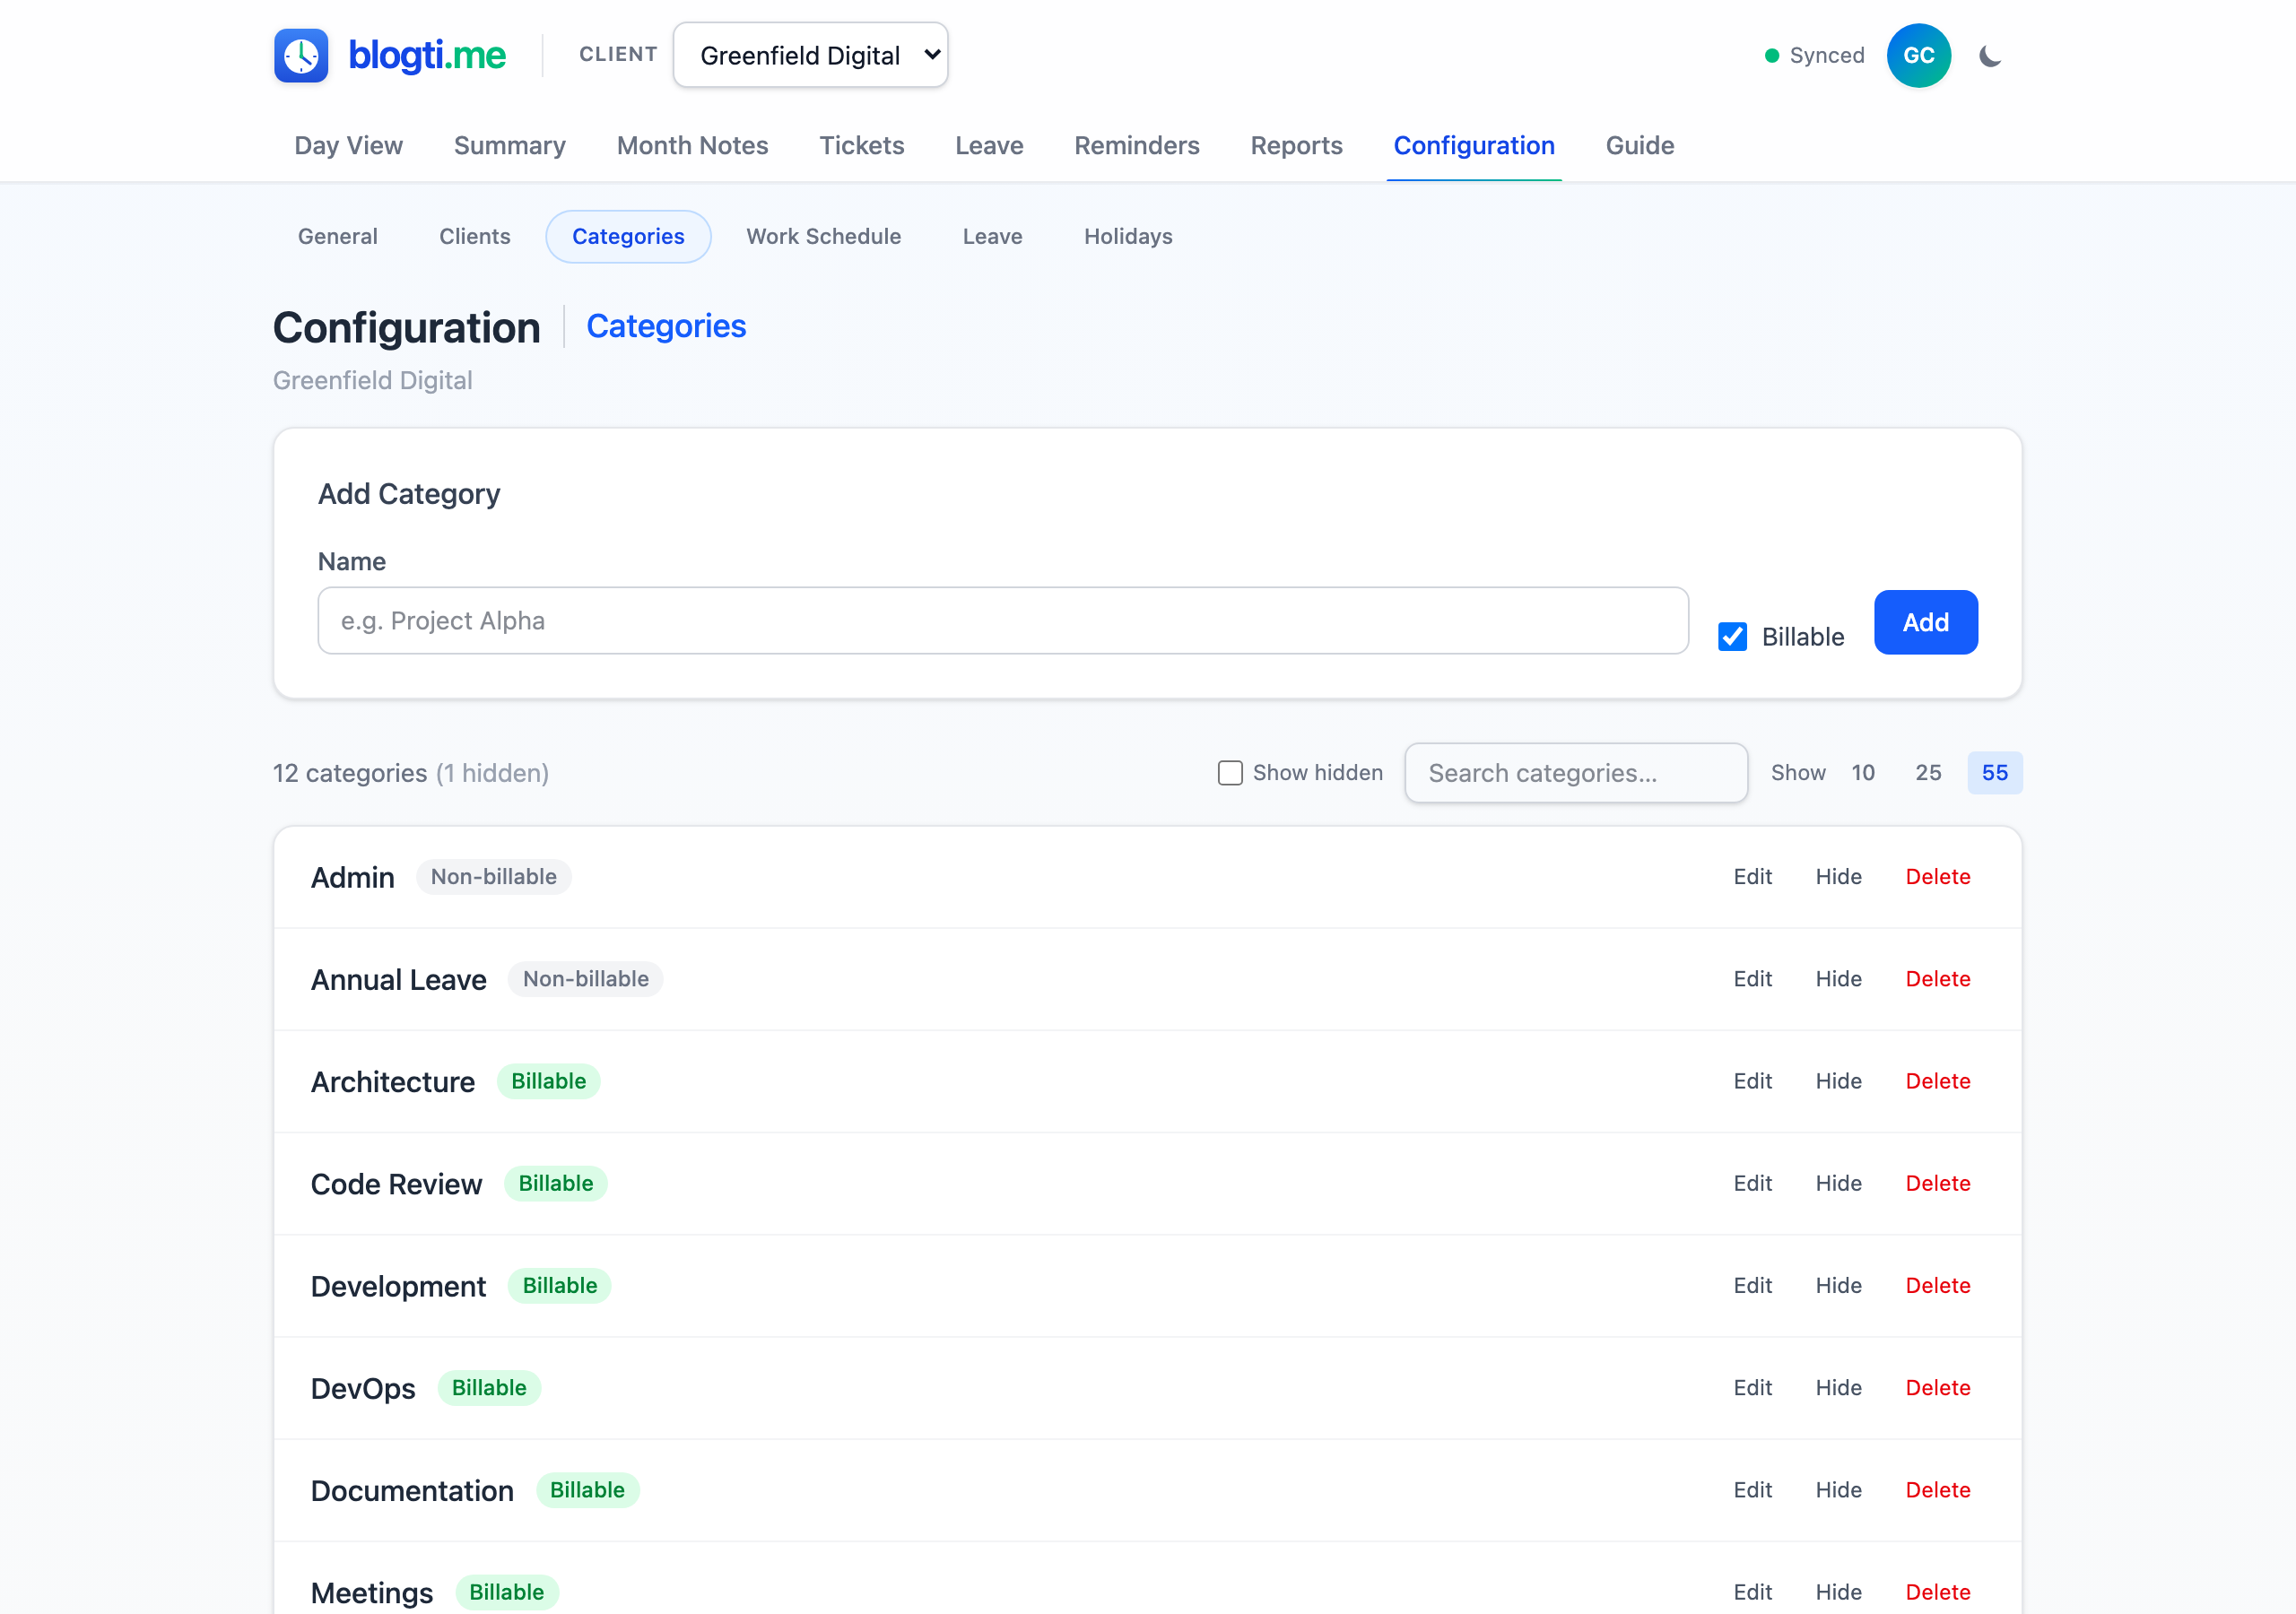
Creating a Category
Enter a name, toggle the Billable checkbox, and click Add. You can also create categories on the fly from the Day View dropdown (+ New category...).
Billable vs Non-billable
Mark a category as Billable if the time counts toward invoicing. Non-billable categories (leave, admin, internal meetings) are tracked separately in summaries and generated reports.
Editing
Click Edit on any category to rename it or toggle its billable status inline.
Hiding and Showing
Click Hide to retire a category from active use. It remains visible for dates before the hide date, keeping your history intact. The hide date defaults to today and can be changed by clicking the amber "Hidden from" badge. Click Show to reinstate.
Deleting
Delete is always available on a category row. If the category isn't referenced by any messages or tickets, you'll see the usual two-step inline confirm and the category is soft-deleted.
If the category is still in use, clicking Delete reveals a Move them to: picker listing every other category for the same client, plus a Leave unassigned option. Confirming reassigns every referencing message and ticket to your chosen target (or clears the reference entirely) and then deletes the original — all in one transaction. The destination's In use count is bumped by the number of moved messages; tickets don't contribute to that count.
Lists default to alphabetical order — categories by name, tickets by number
(numeric-aware, so PROJ-2 sorts
before PROJ-10), clients by name.
Tickets
Tickets let you track time against specific work items or project references (like JIRA tickets).
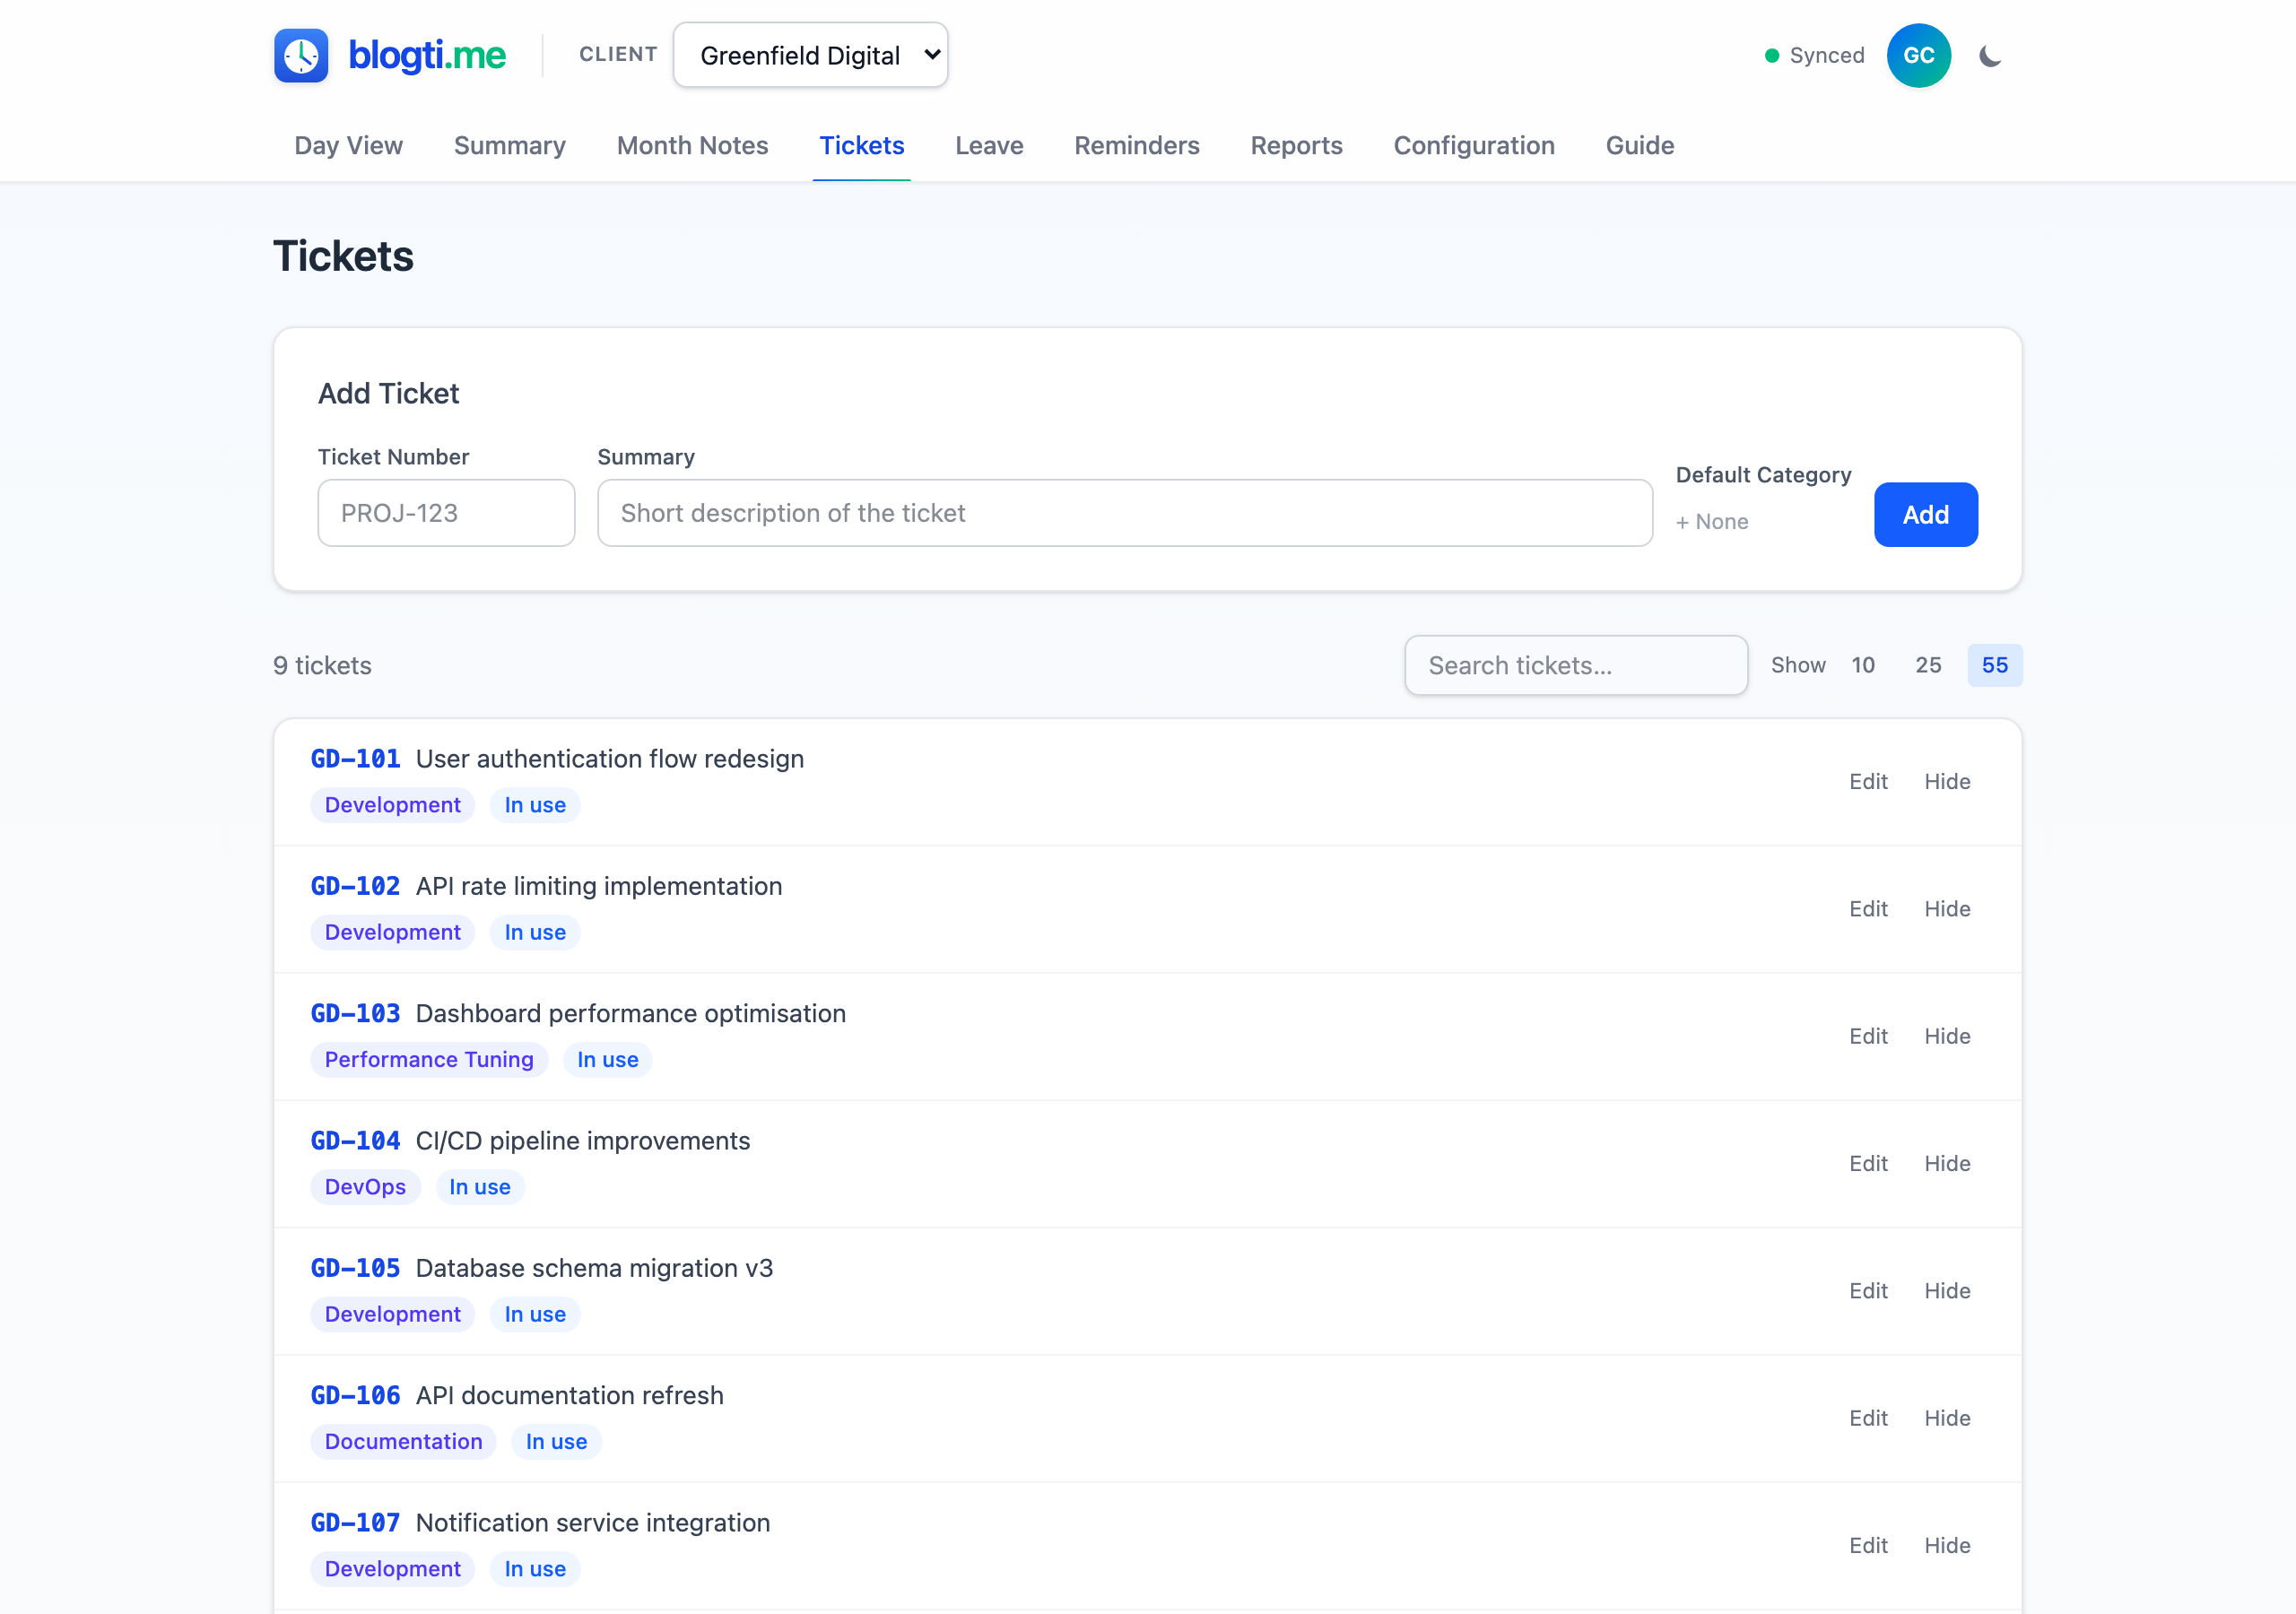
Adding a Ticket
Enter a Ticket Number (e.g. PROJ-123) and Summary, then click Add. Optionally pick a Default Category — it pre-fills the category whenever a message references
this ticket.
If you leave the default category blank, an amber "No default category selected — add this ticket anyway?" prompt appears below the form. Click Add without category to confirm, or just pick a category — selecting one dismisses the prompt automatically. Duplicates within the same client aren't allowed. The same prompt also fires when editing a ticket and saving without a default category, and when creating a ticket on-the-fly from the day view's message form.
Editing
Click Edit on any ticket to change the number or summary inline.
Hiding and Deleting
Hide retires a ticket from dropdowns for dates on or after the hide date (editable via the badge). Delete is only available when the ticket isn't assigned to any messages — in-use tickets show an In use badge.
Message Templates
Message templates are reusable quick-fills for activities you log repeatedly — your daily standup line, a weekly status note, the "Code review" entry you log three times a day. Each template stores a short label, the content to drop into the message, and an optional default category. Templates are scoped per-client and managed under Configuration > Templates.
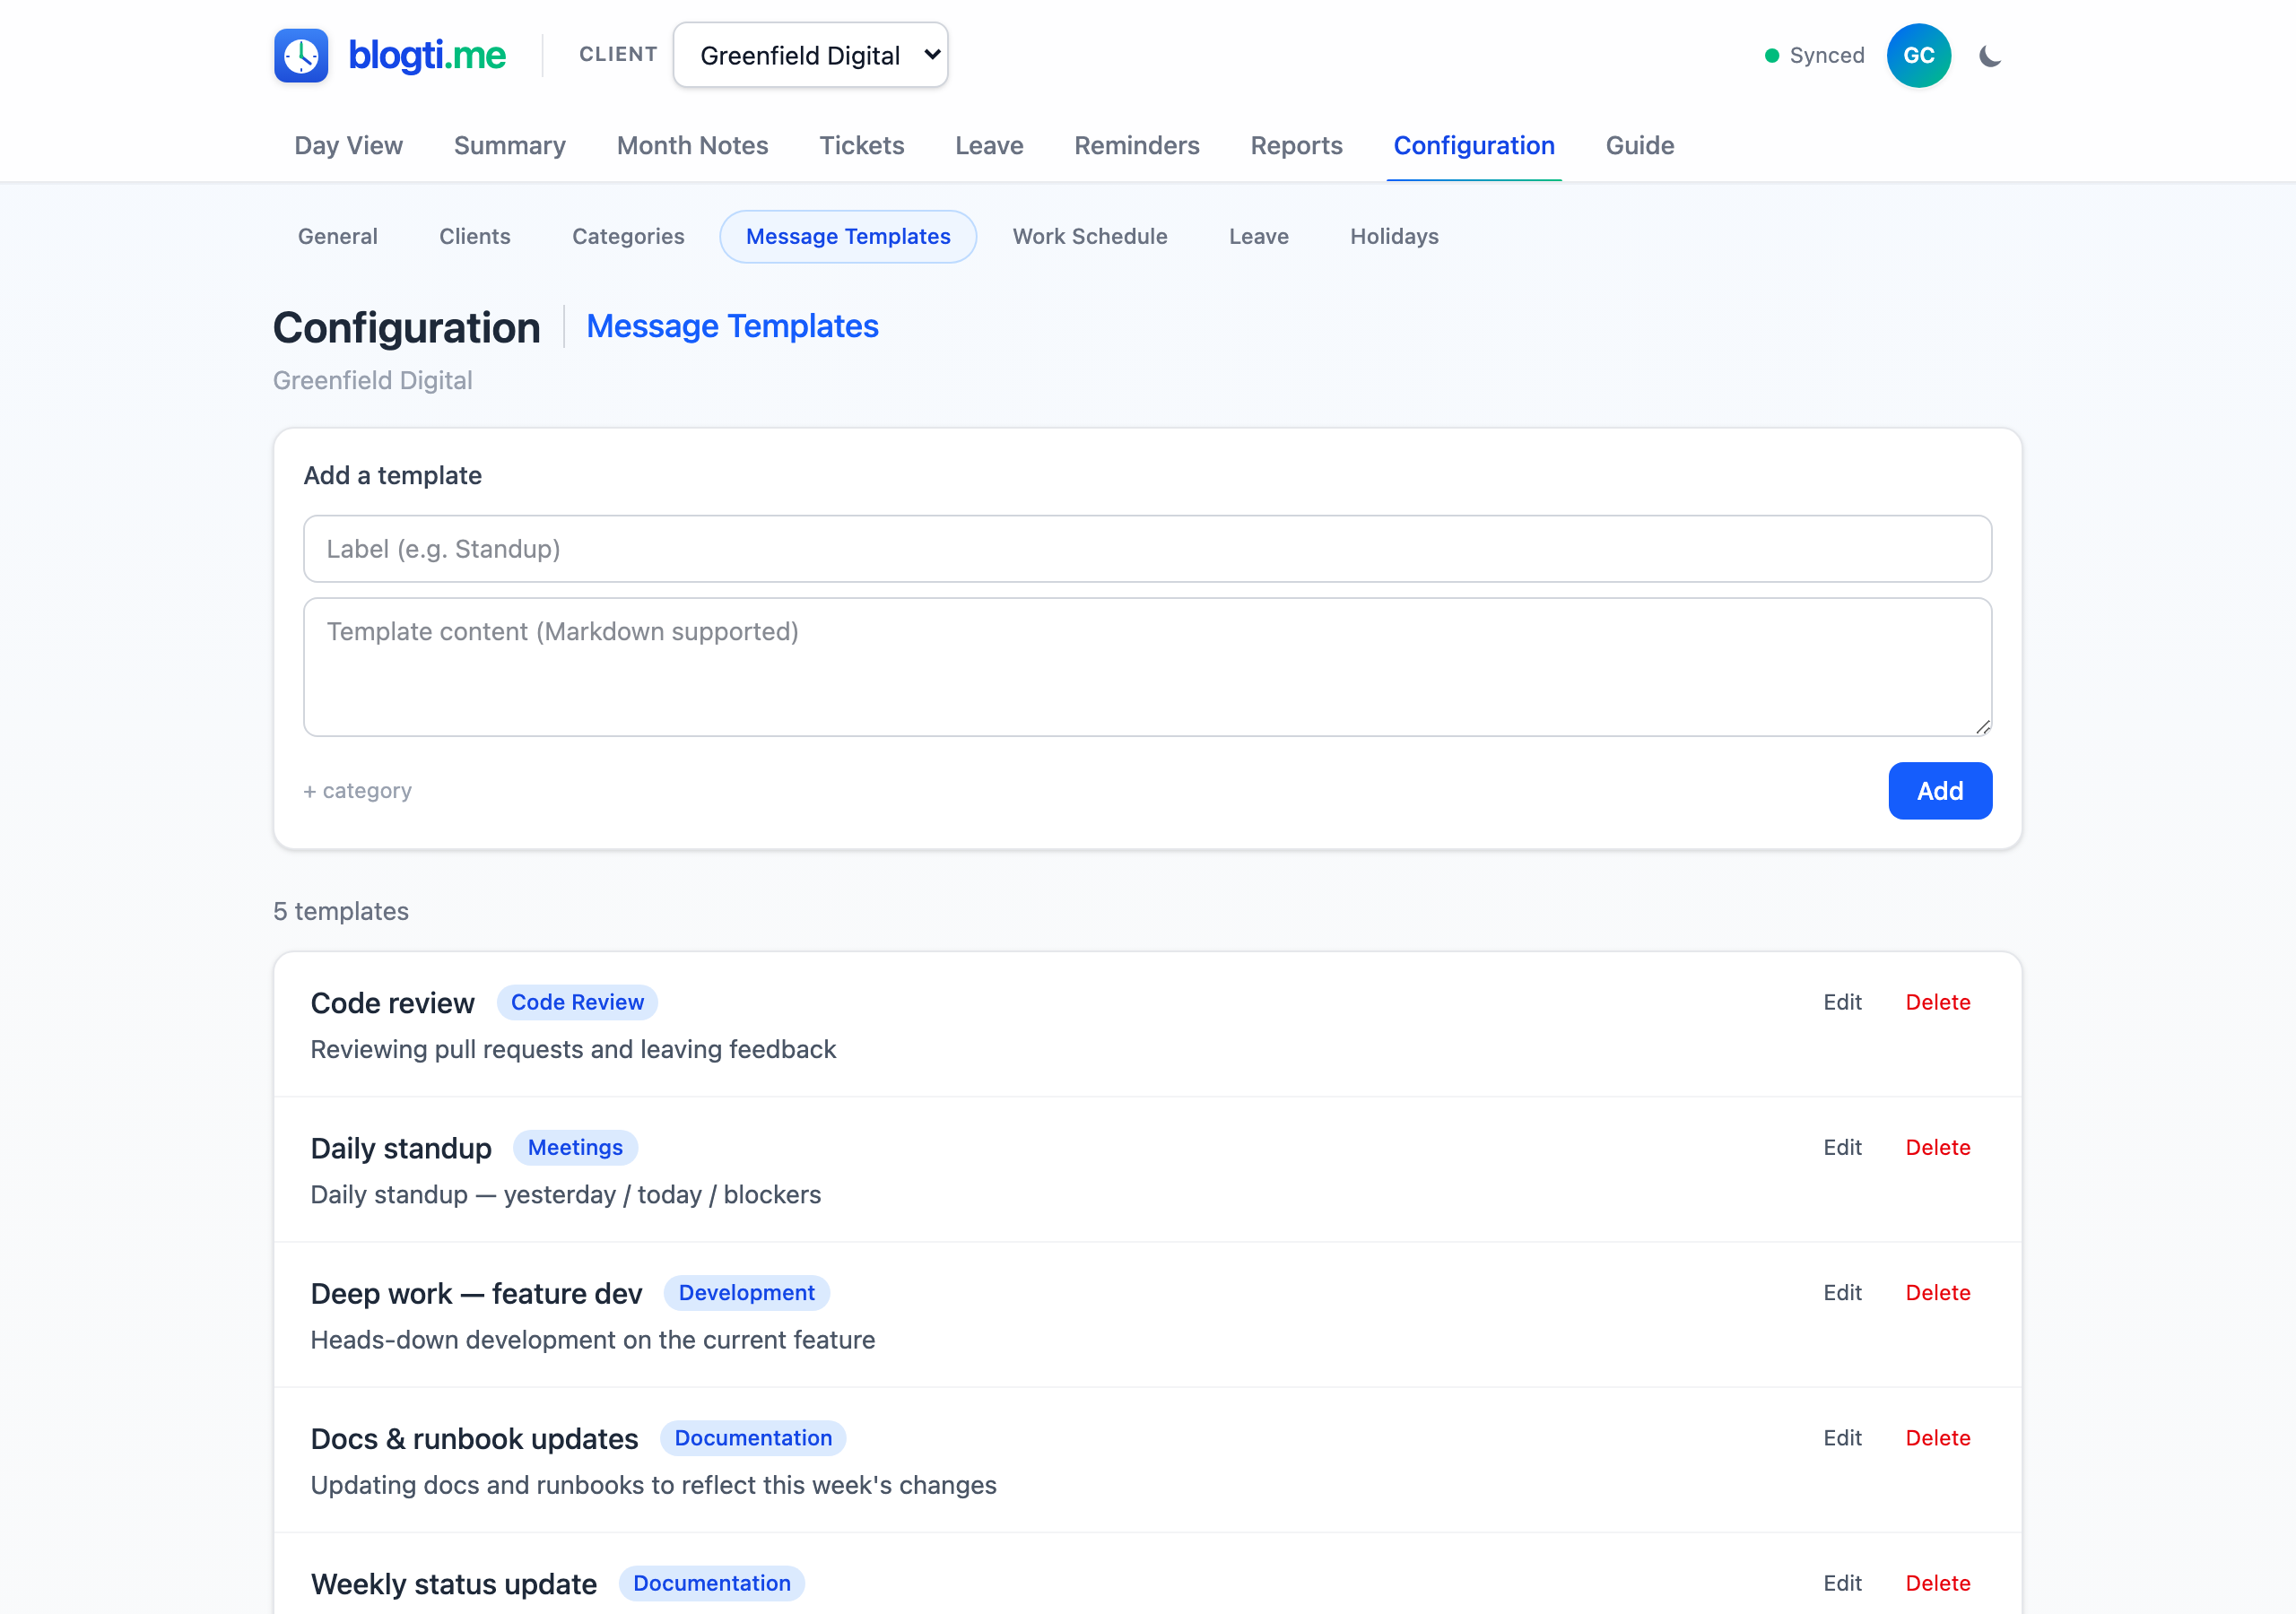
Creating a Template
Enter a short Label (this is what shows up in the picker), type the Content that should drop into the message (multi-line + Markdown both work), and optionally pick a default category via the + category link — applied automatically whenever the template is used. Click Add.
Tickets are intentionally not part of templates. Tickets tend to be short-lived, so binding a template to one leaves stale references; pick the ticket on the message form after applying the template if you need one.
Using a Template
On the Day View, the message-form option row carries a + template link next to + time / + block. Click it, pick a template, and the form is populated — the existing content is overwritten and the template's default category is applied if one was set. Adjust as needed (set a ticket, edit the text) and submit.
Editing and Deleting
Each row on the templates page exposes Edit and Delete. The edit form mirrors the new-message form layout. Delete uses the standard two-step inline confirmation. Templates list alphabetically by label everywhere they appear.
Clients
Clients are the top-level organiser for all your data. Every category, message, leave record, and report belongs to a client. Navigate to Configuration > Clients to manage them.
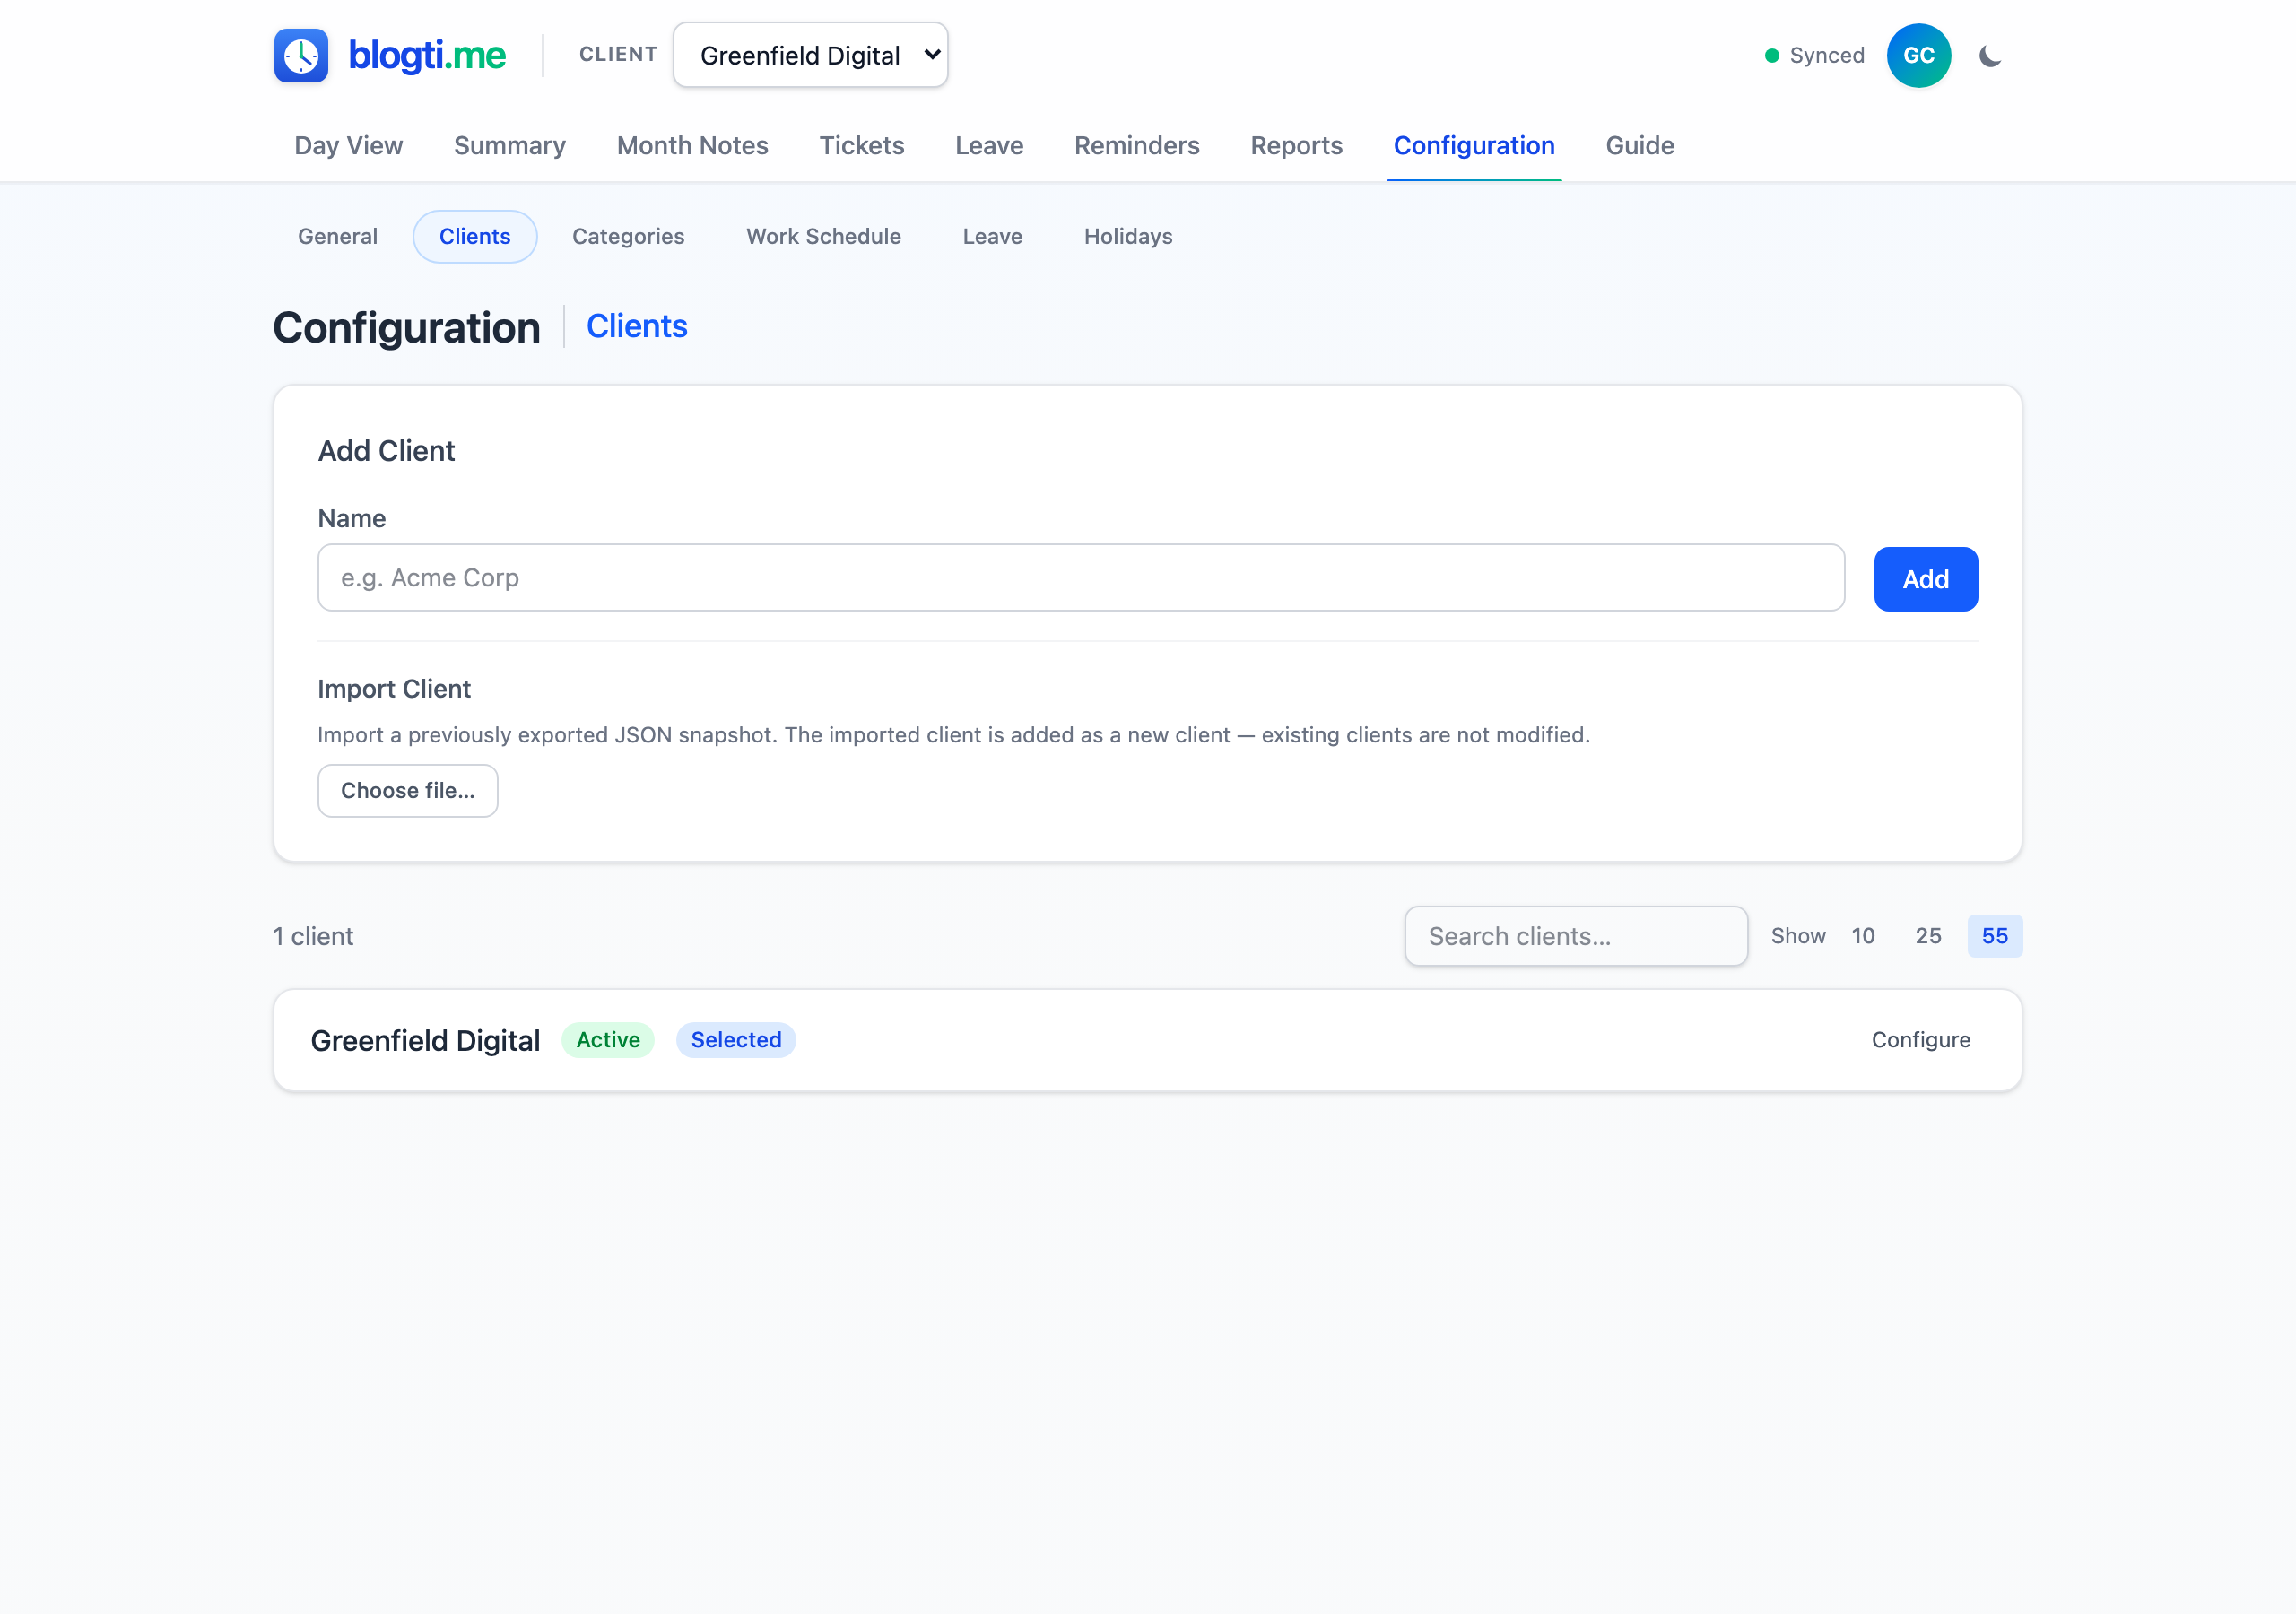
Creating a Client
Enter a name and click Add. Each client gets a permanent folder slug (based on the name) used in report filenames — this never changes even if you rename the client.
Client Configuration
Expand the Configure panel on any client to set up metadata for generated reports:
- Client Number — a reference printed on reports.
- Client Logo / Contracting House Logo — uploaded images for reports.
- Contracting House Name — used in leave application signature blocks.
- Report Letterhead — image at the top of every PDF page.
- Report Footer — image at the bottom of every PDF page.
Activating and Deactivating
Deactivate a client to hide it from the header selector while preserving its data. You can't deactivate the currently selected client — switch to another one first. Activate brings it back.
Exporting and Importing
Export downloads a complete JSON snapshot of a client's data. Import (under Add Client) uploads a snapshot and creates it as a brand new client — it never overwrites existing data. Letterhead/footer images aren't included in exports and need to be re-uploaded.
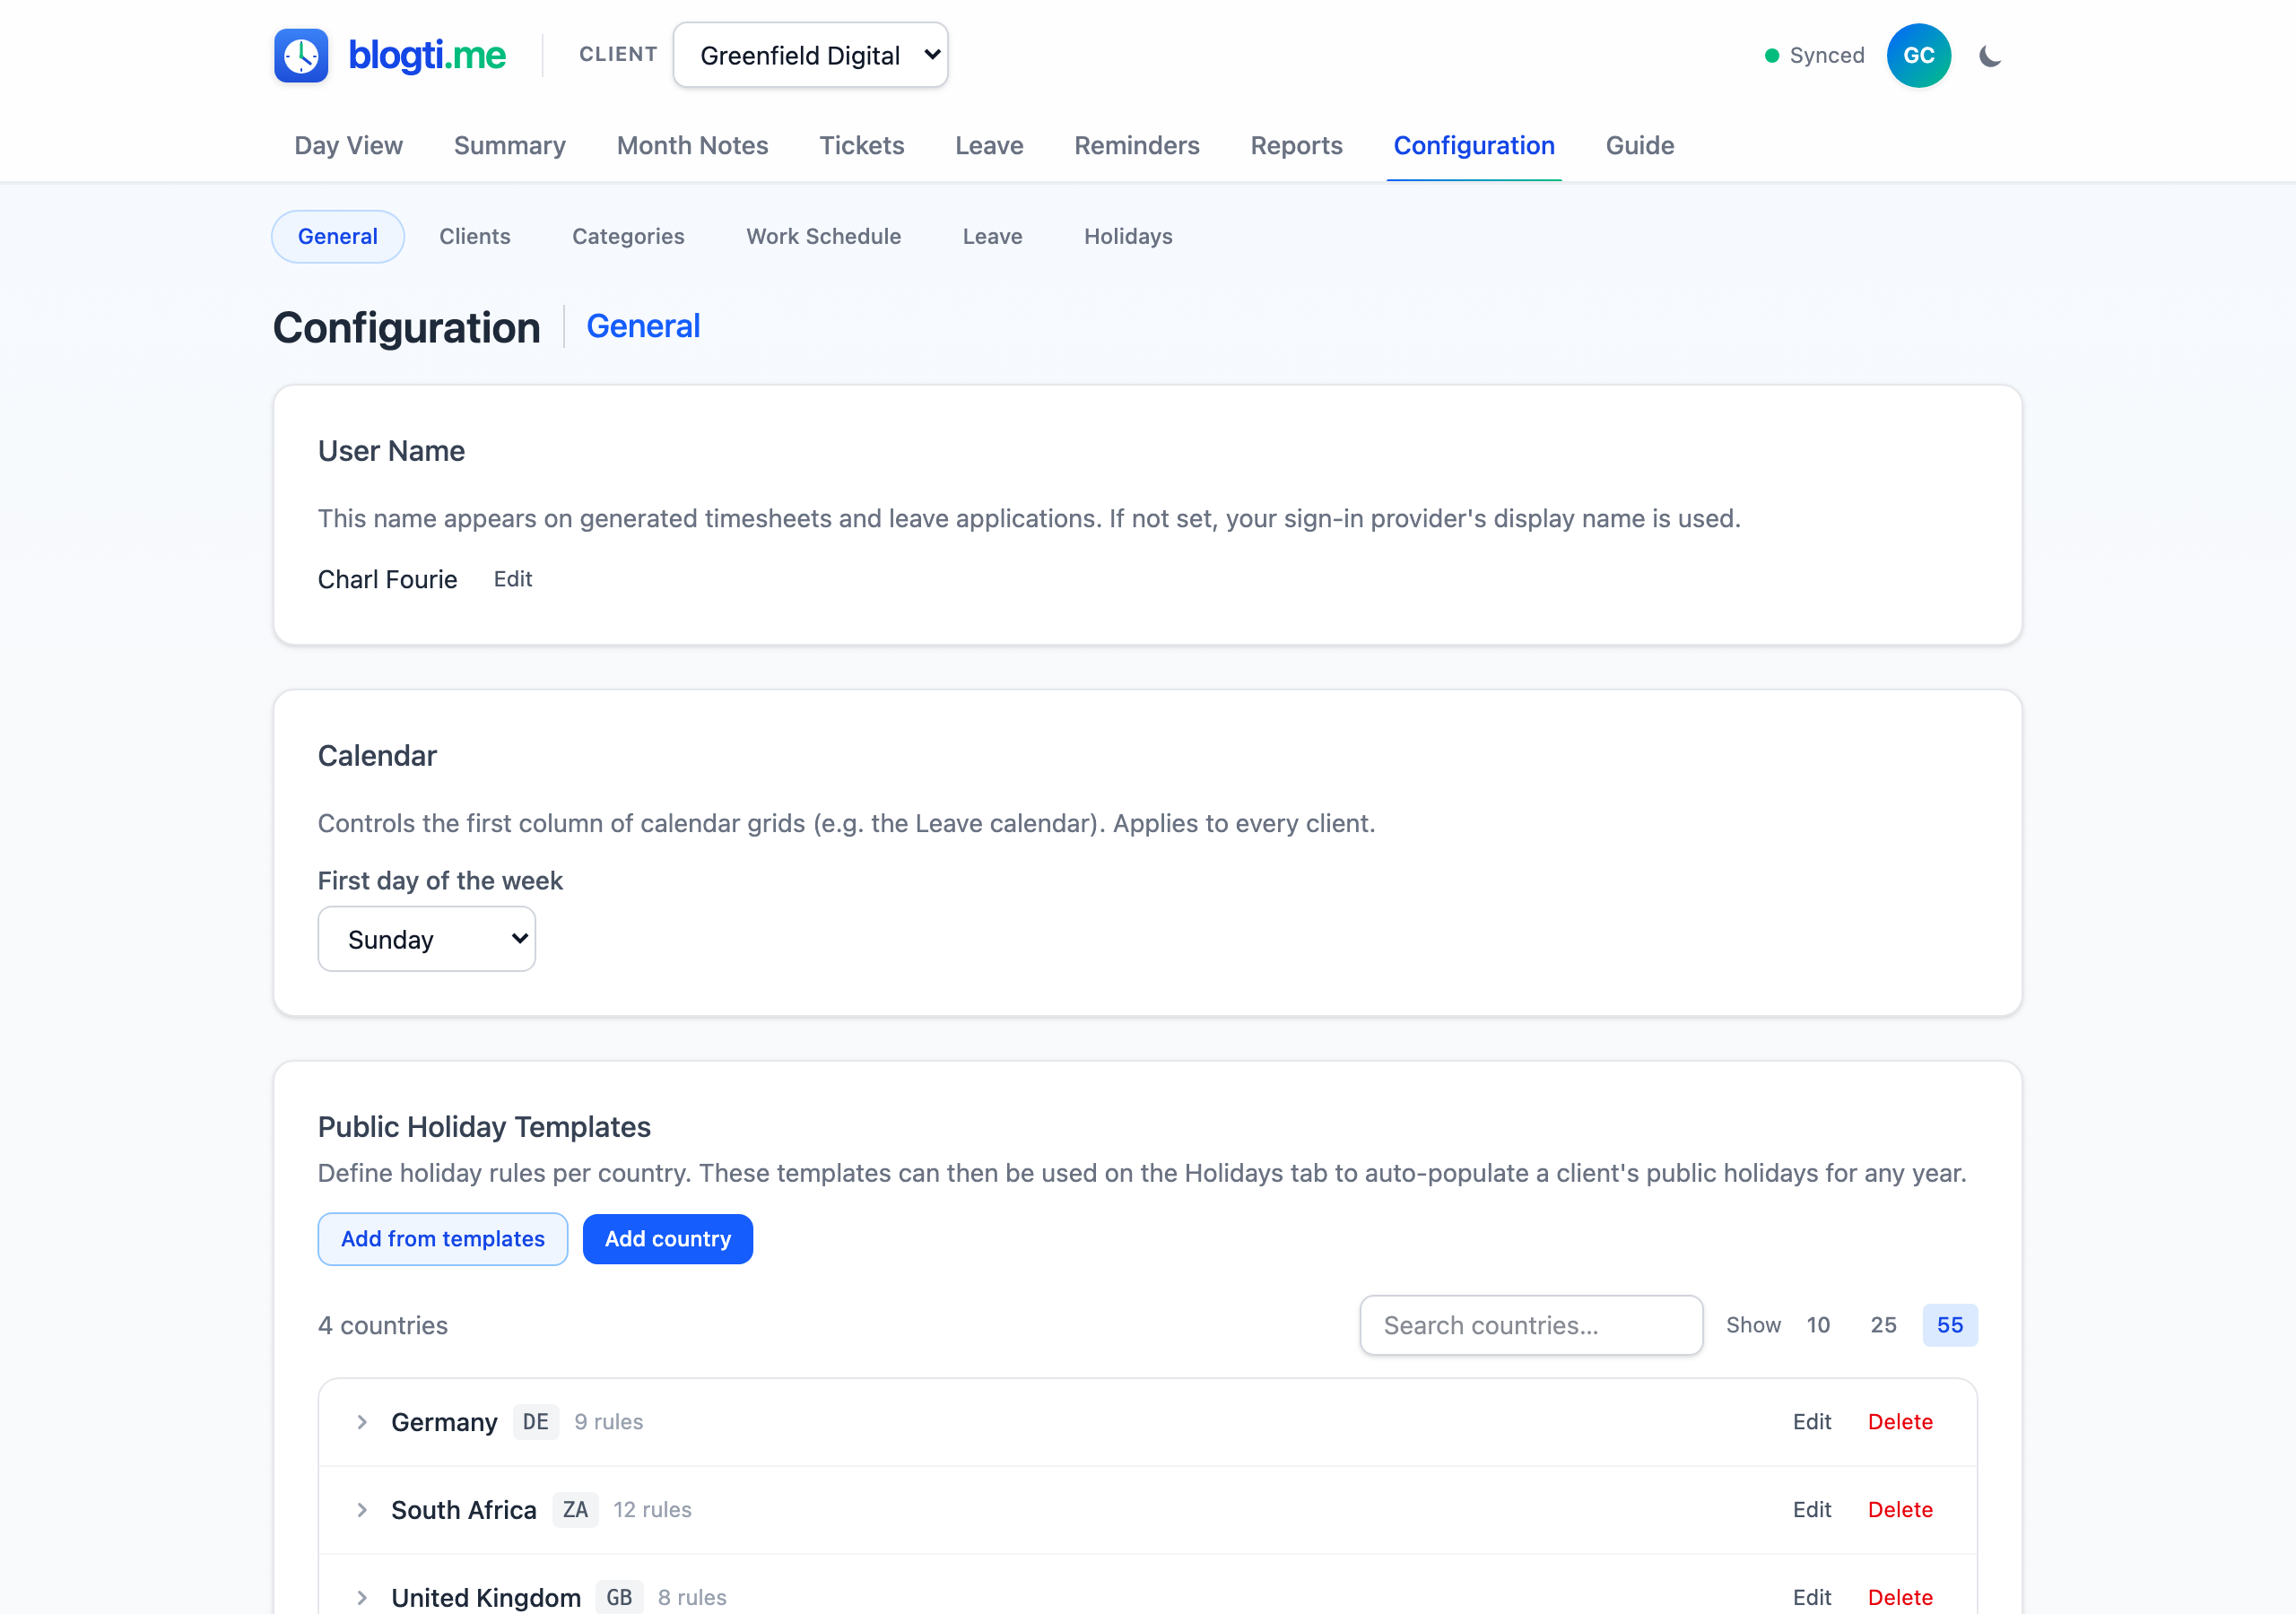
General App-level Settings
Three app-level settings live on Configuration > General and are shared across every client:
- User Name — appears on generated timesheets and leave applications. If unset, the app uses your sign-in provider's display name.
- First day of the week — Sunday through Saturday (default: Sunday). Controls the first column of every calendar grid in the app, including the Leave calendar.
- Public Holiday Templates — country templates used by the Holidays page to auto-populate public holidays for any year. Seed defaults cover 28 countries; you can also add your own countries and rules.
Work Schedule
Each client has a configurable work schedule that defines which days of the week you work and how many hours per day. The schedule is used by leave calculations and timesheet projections. Navigate to Configuration > Work Schedule to manage it.
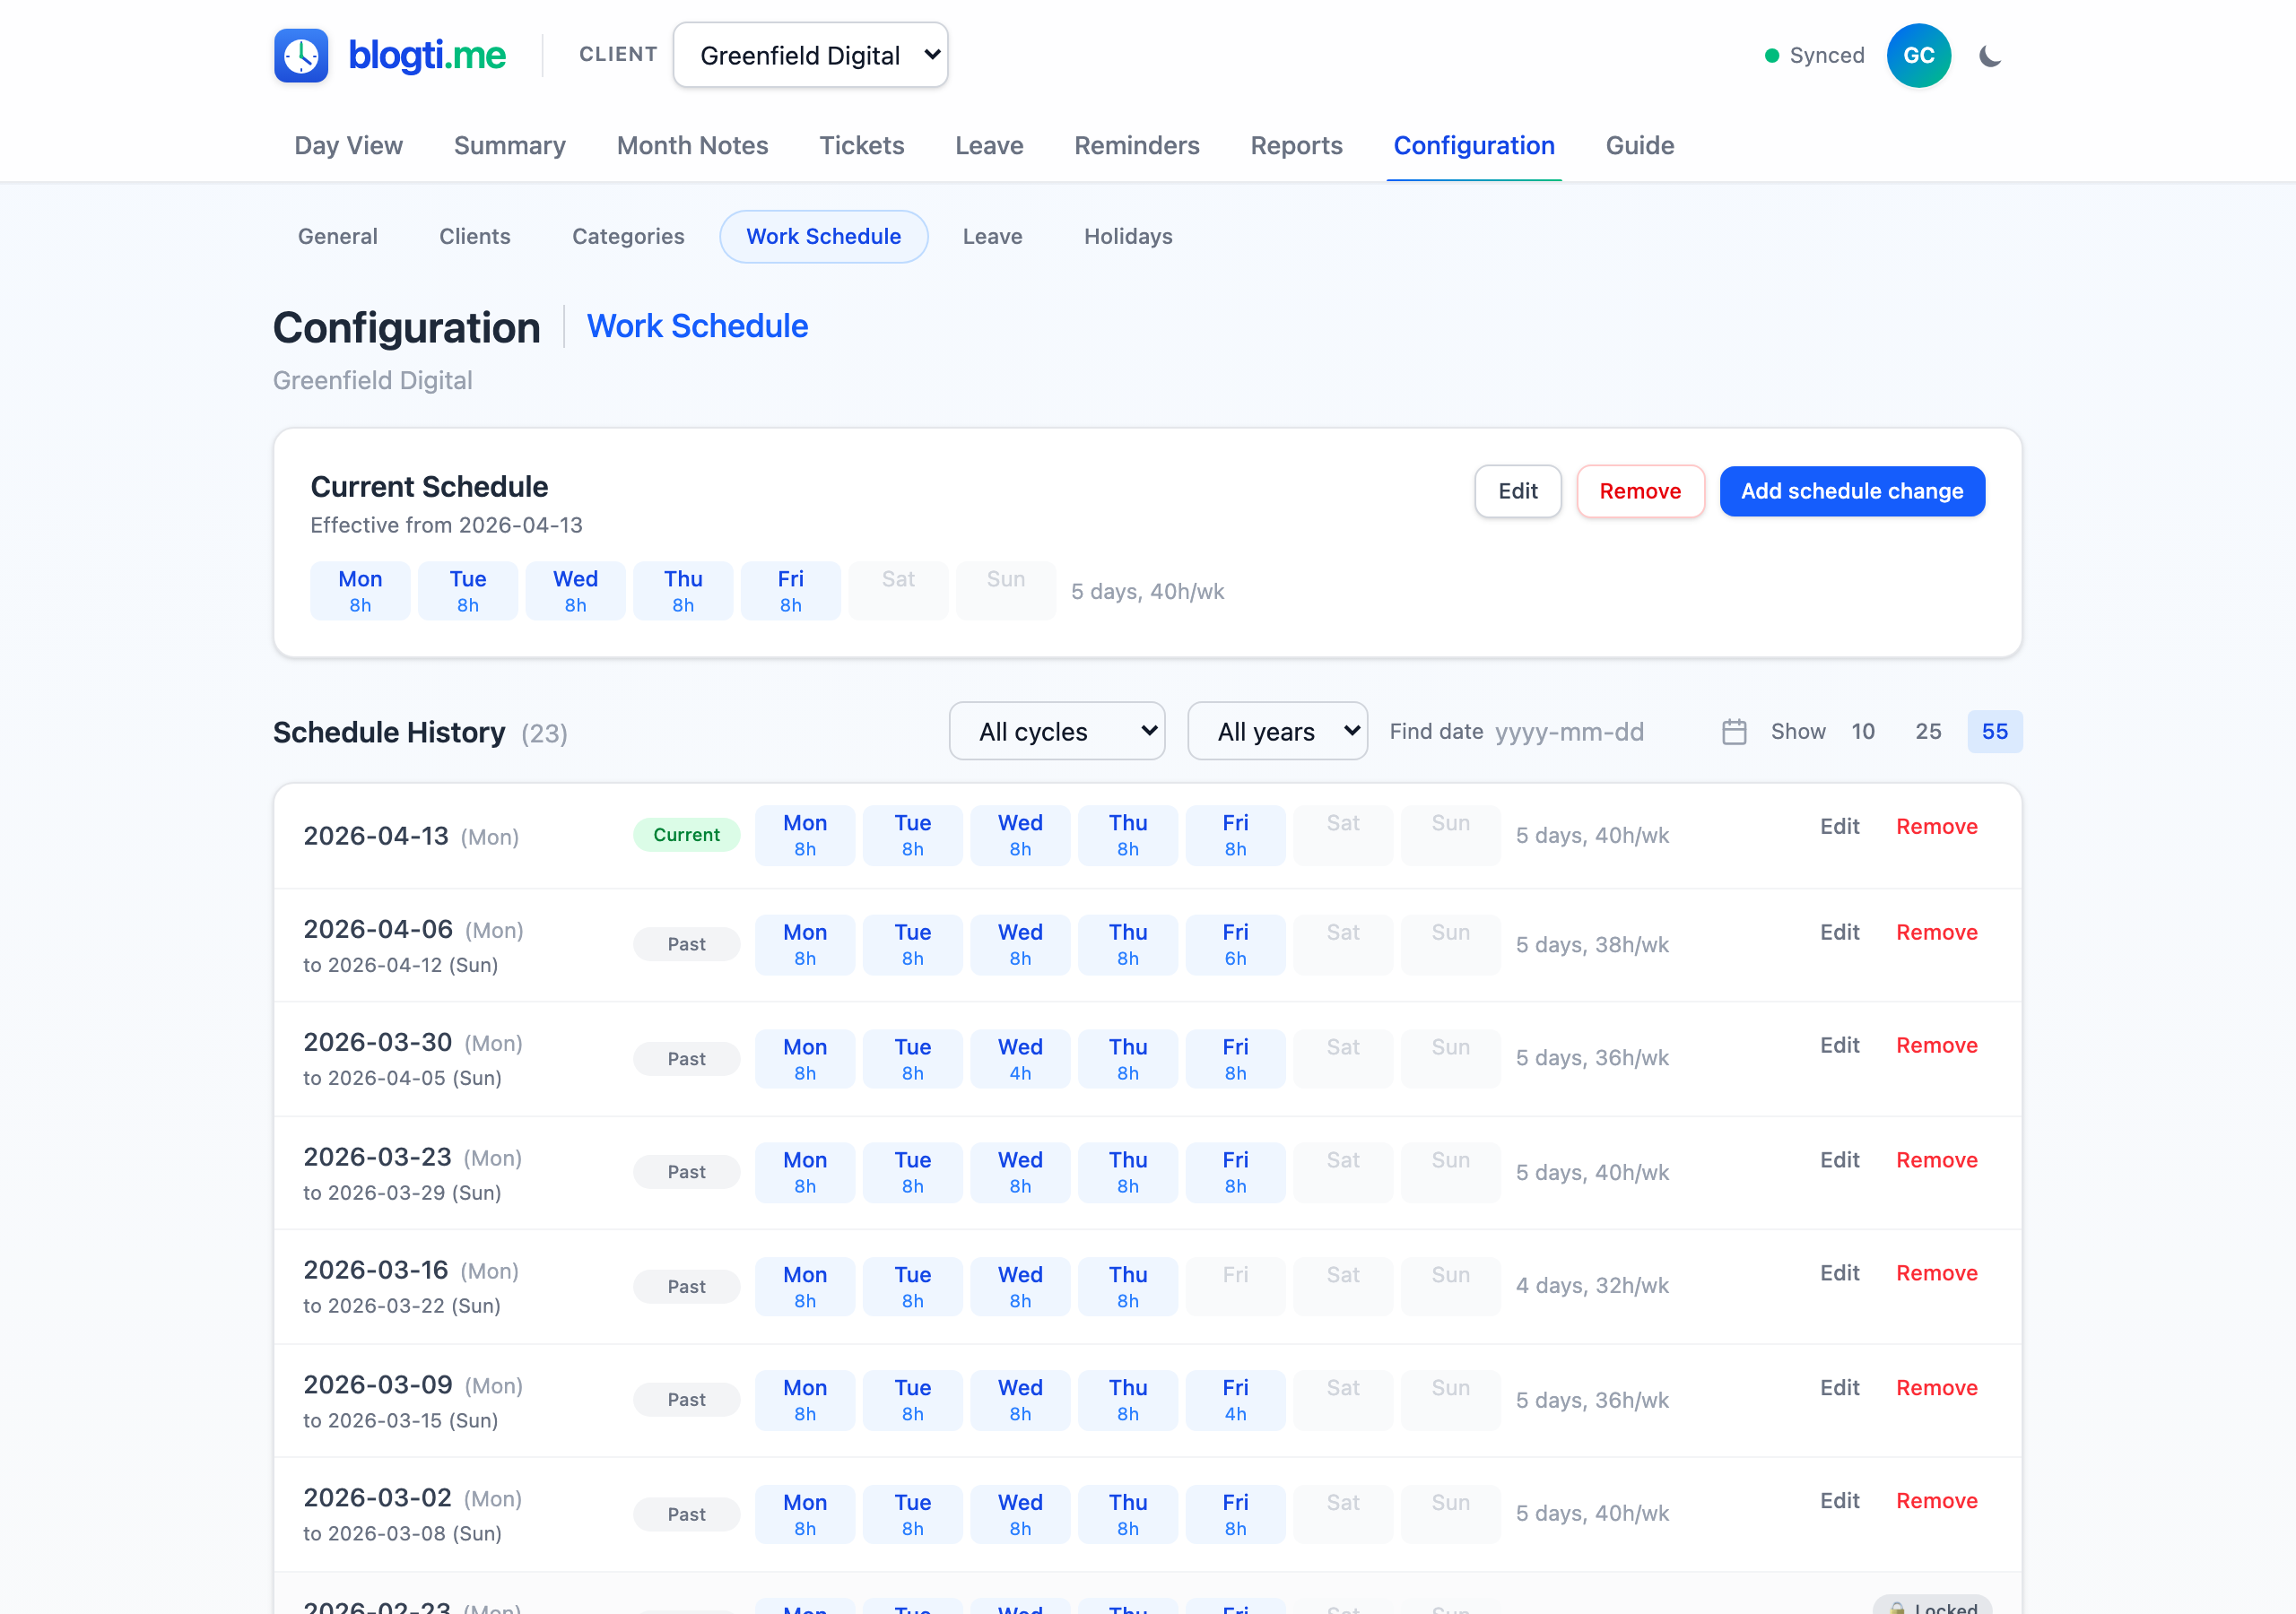
Current Schedule
The top card shows the currently active schedule — which days are working days and how many hours per day. Each day appears as a chip: Mon 8h for active days, grayed out for off days. A weekly summary (e.g. "5 days, 40h/wk") appears alongside.
Click Edit to modify the schedule. Toggle days on/off by clicking the day buttons, and adjust the hours per day for each active day. Click Save to apply changes.
Schedule Changes
If your working hours change (e.g. moving from 5 days to 4 days a week), click Add schedule change to create a new schedule entry with an effective date. The previous schedule remains in history, and the app uses the correct schedule for any given date — so leave calculations and reports are always accurate, even across schedule changes.
Schedule History
All schedule entries are listed in reverse chronological order. Each entry shows its effective date, day chips, and a status badge: Current, Future, or Past. You can edit or remove any entry except the initial one.
Find by Date
When you have many schedule entries, use the Find date input to jump to the schedule that was active on a specific date. The matching entry is highlighted with an amber banner showing the effective date range.
Leave Management
blogti.me includes a full leave tracking system integrated with your time data. The top-level Leave tab opens on a visual calendar by default, and has three sub-views: Calendar, List, and Balances. Cycle setup and per-cycle allocation overrides live under Configuration > Leave.
Calendar View (default)
The Calendar sub-tab visualises weekends, public holidays, locked past cycles, and currently booked leave — colour-coded by type (Annual · Sick · Family). A view switcher toggles between two layouts:
- Cycle (default) — all twelve months of the active leave cycle at a glance, stripped of text so colour alone tells you where bookings live. Prev/next cycle navigation lets you browse history and future cycles.
- Month — a single month with full day numbers, holiday names, and a per-type coloured pill on each booked day showing the leave's full description (the comment entered when booking; falls back to the leave-type label when no comment was supplied). Prev/next month navigation.
Cell styling follows a fixed priority: public holiday (rose) beats non-working day (grey weekend or off-schedule) which beats booked leave (blue/amber/purple by type). Today's cell has a thick red inset ring; when today is inside an active selection the blue selection outline takes precedence.
Individual leave working-days that push the running available balance negative are flagged independently — the type colour stays visible underneath either overlay:
- An orange corner-triangle (top-right) marks a weak warning — the running balance is negative at that day, but cumulative cycle bookings still fit within your cycle capacity, so future accrual will absorb it.
- Bright-red diagonal stripes across the cell mark a strong warning —
cumulative cycle bookings through that day already exceed the cycle's total capacity,
so no future accrual can cover it. In month view the description pill also gets a trailing
!(e.g.,Vacation!).
A single booking can therefore show any mix of no-warning, weak-triangle, and strong-striped days — each day reflects its own status at that point in the cycle.

Click and drag any date range — even across month boundaries in cycle view. Depending on what the selection contains, a capture panel beneath the grid offers one or both of:
- Book leave — available when the selection contains any unbooked working day, or when the comment you type differs from the comment on a same-type booking already covering one of your selected days (so you can re-comment a stretch of an existing booking).
- Remove leave — available when the selection contains any booked working day. Removes or trims whatever leave (of any type) touches those days.
Booking follows one simple rule: every selected working day takes the new comment; any untouched days of existing events keep their original comment. Adjacent runs with the same comment merge (weekends and public holidays inside a run are bridged, at the edges they're trimmed) so each comment ends up with the minimum number of events per month. Runs with different comments stay separate, even when they sit next to each other. Ranges that cross a month boundary are handled silently per month — no preview, no prompt.
The first column of every calendar grid follows your First day of the week setting under Configuration > General (default: Sunday).
Compact Balance Summary
A three-card summary sits at the top of both the Calendar and List sub-tabs. Each card (one per leave type) shows two figures — Month end (accrued remaining at month end) and Cycle remaining — both computed exactly as on the Balances page and colour-coded green/amber/red by severity.
List View
The List sub-tab is the original text-form entry point: an inline capture form plus a filterable, paginated history of every leave event. Use this view when you prefer typing dates directly, or when you want to search or review past bookings.
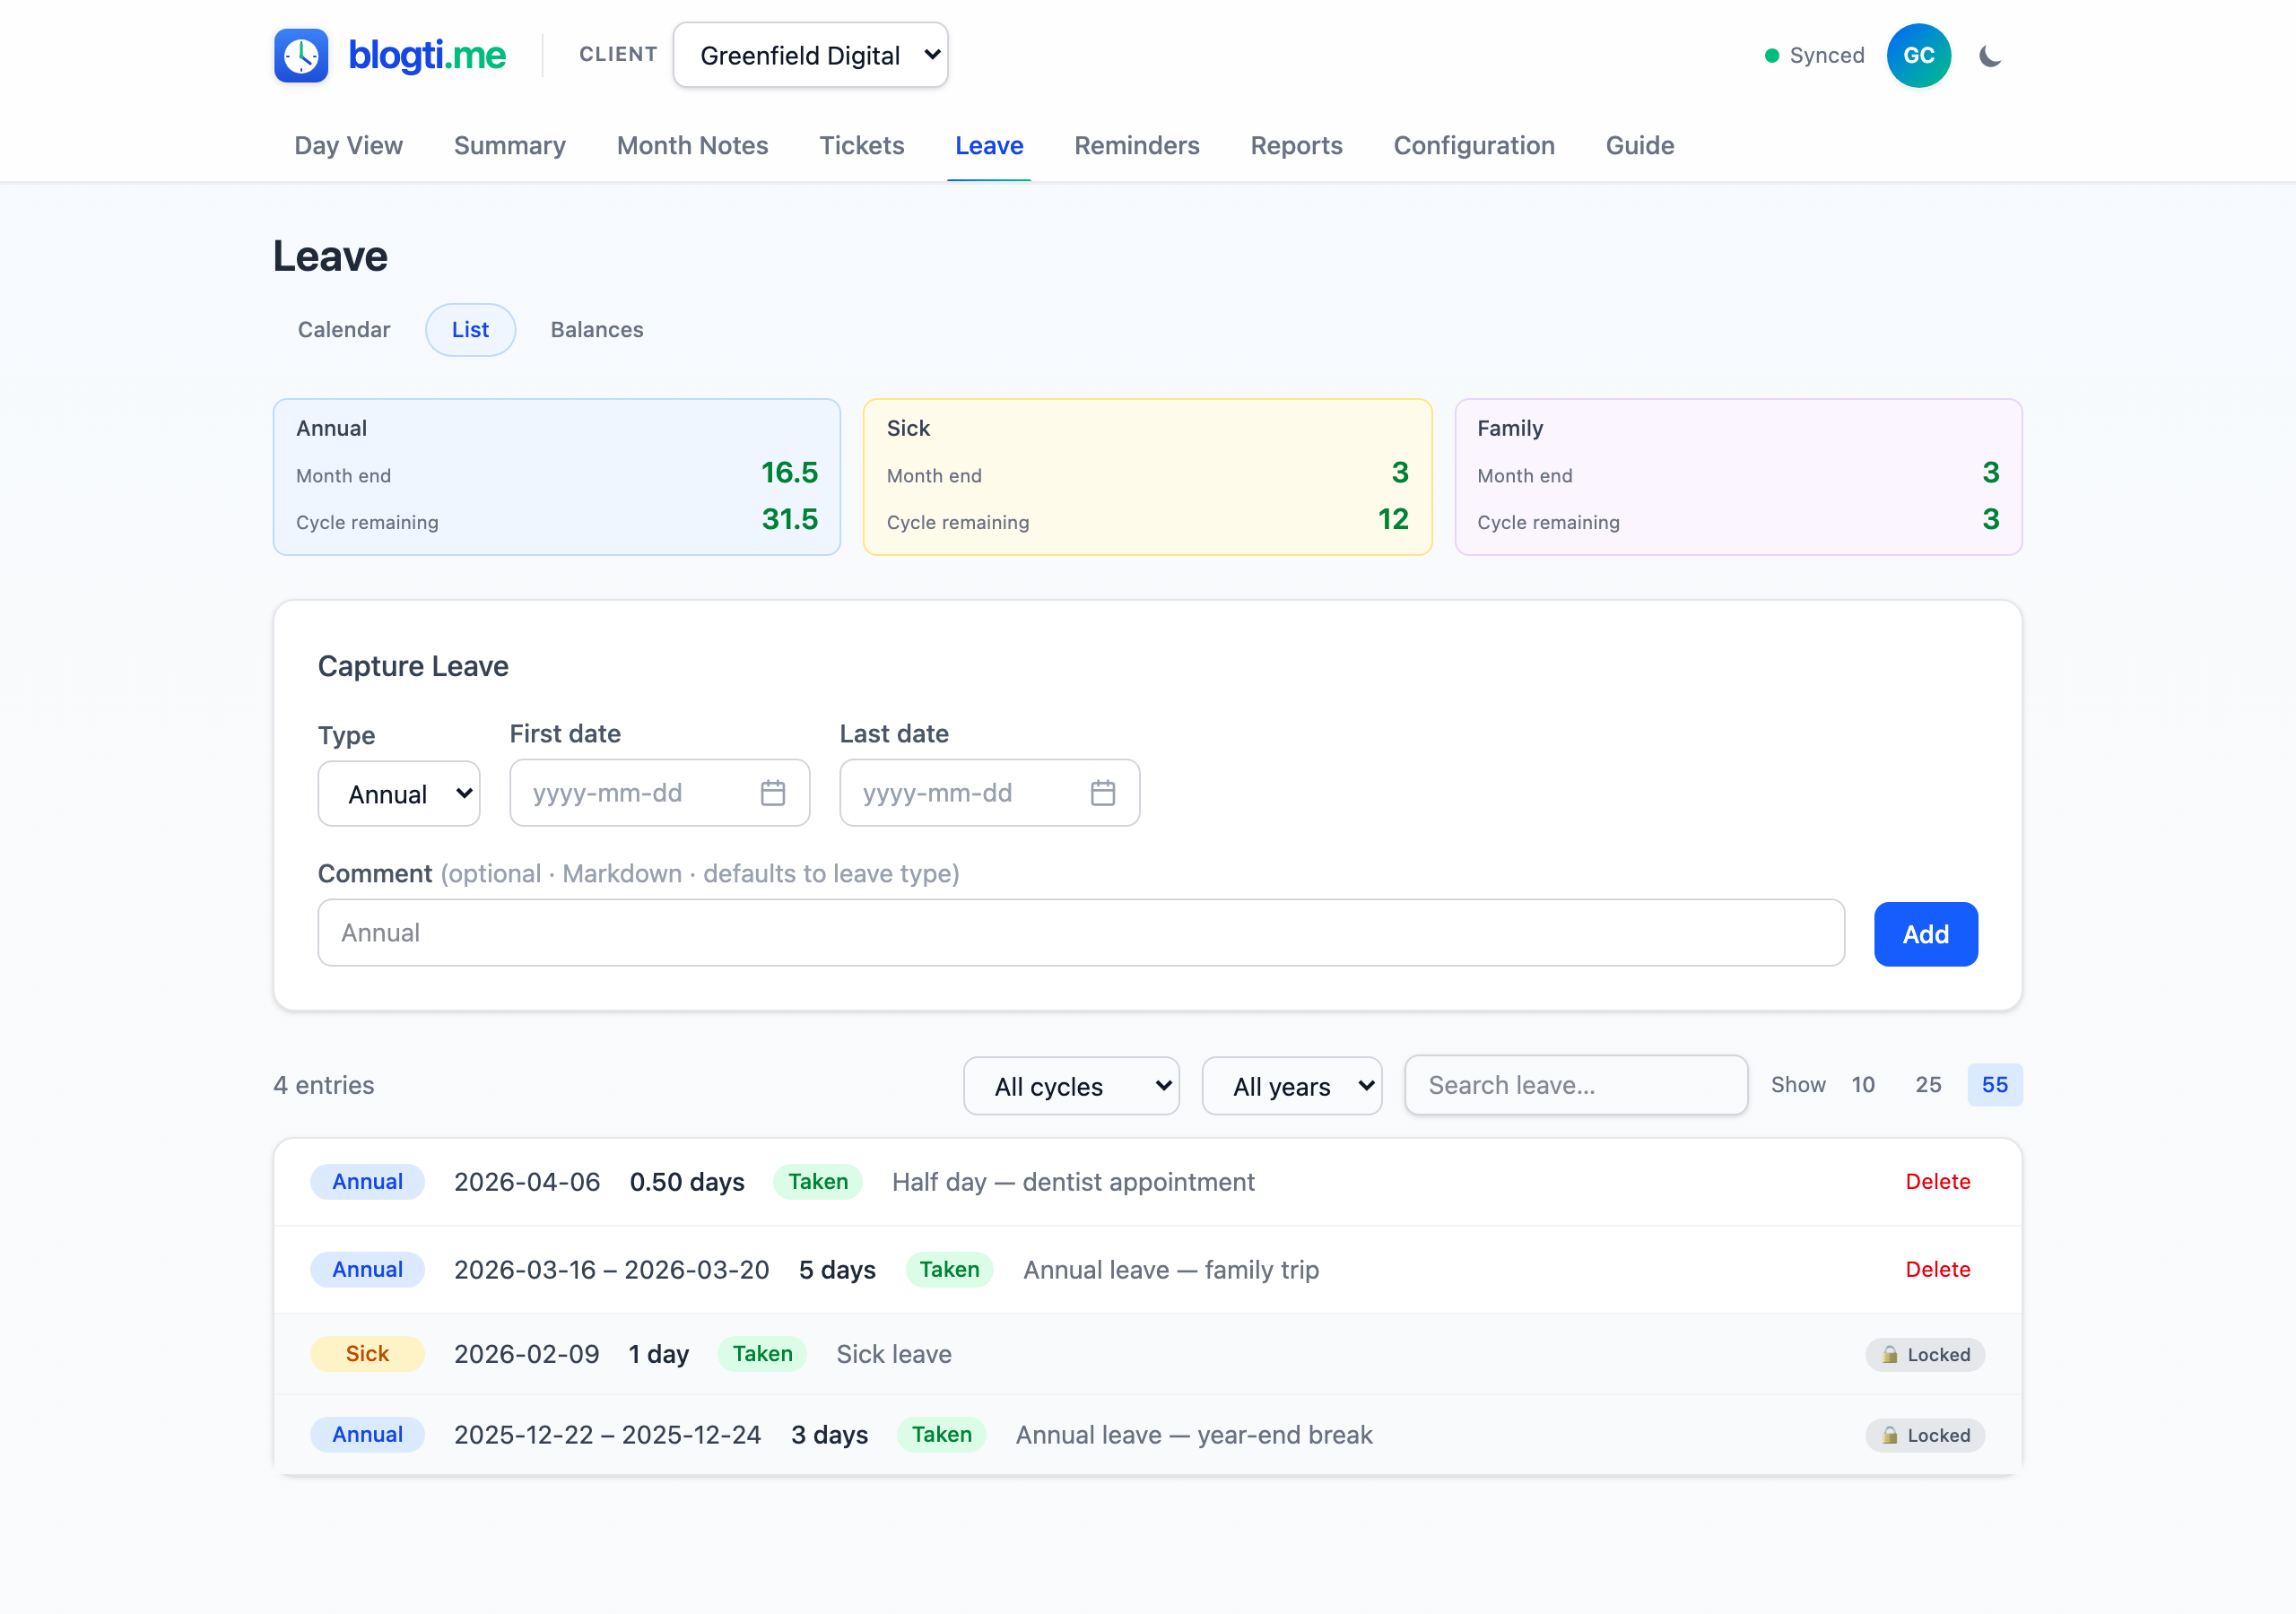
- Select the leave type (Annual, Sick, or Family).
- Pick the first date and last date.
- Working days are calculated automatically from the client's work schedule, excluding public holidays.
- Optionally add a comment.
- Click Add.
For single-day bookings, a Half day checkbox appears — tick it to record 0.5 days instead of 1. Multi-day bookings are always full working days. The history list below the form supports search, cycle/year filters, and pagination (10 / 25 / 55 per page).
Balances View
The Balances sub-tab has the full picture. Three headline cards show the Accrued Remaining Month End figure per leave type — the balance at the end of the current month once bookings up to that point are subtracted. The eight-column breakdown table beneath exposes every underlying number:
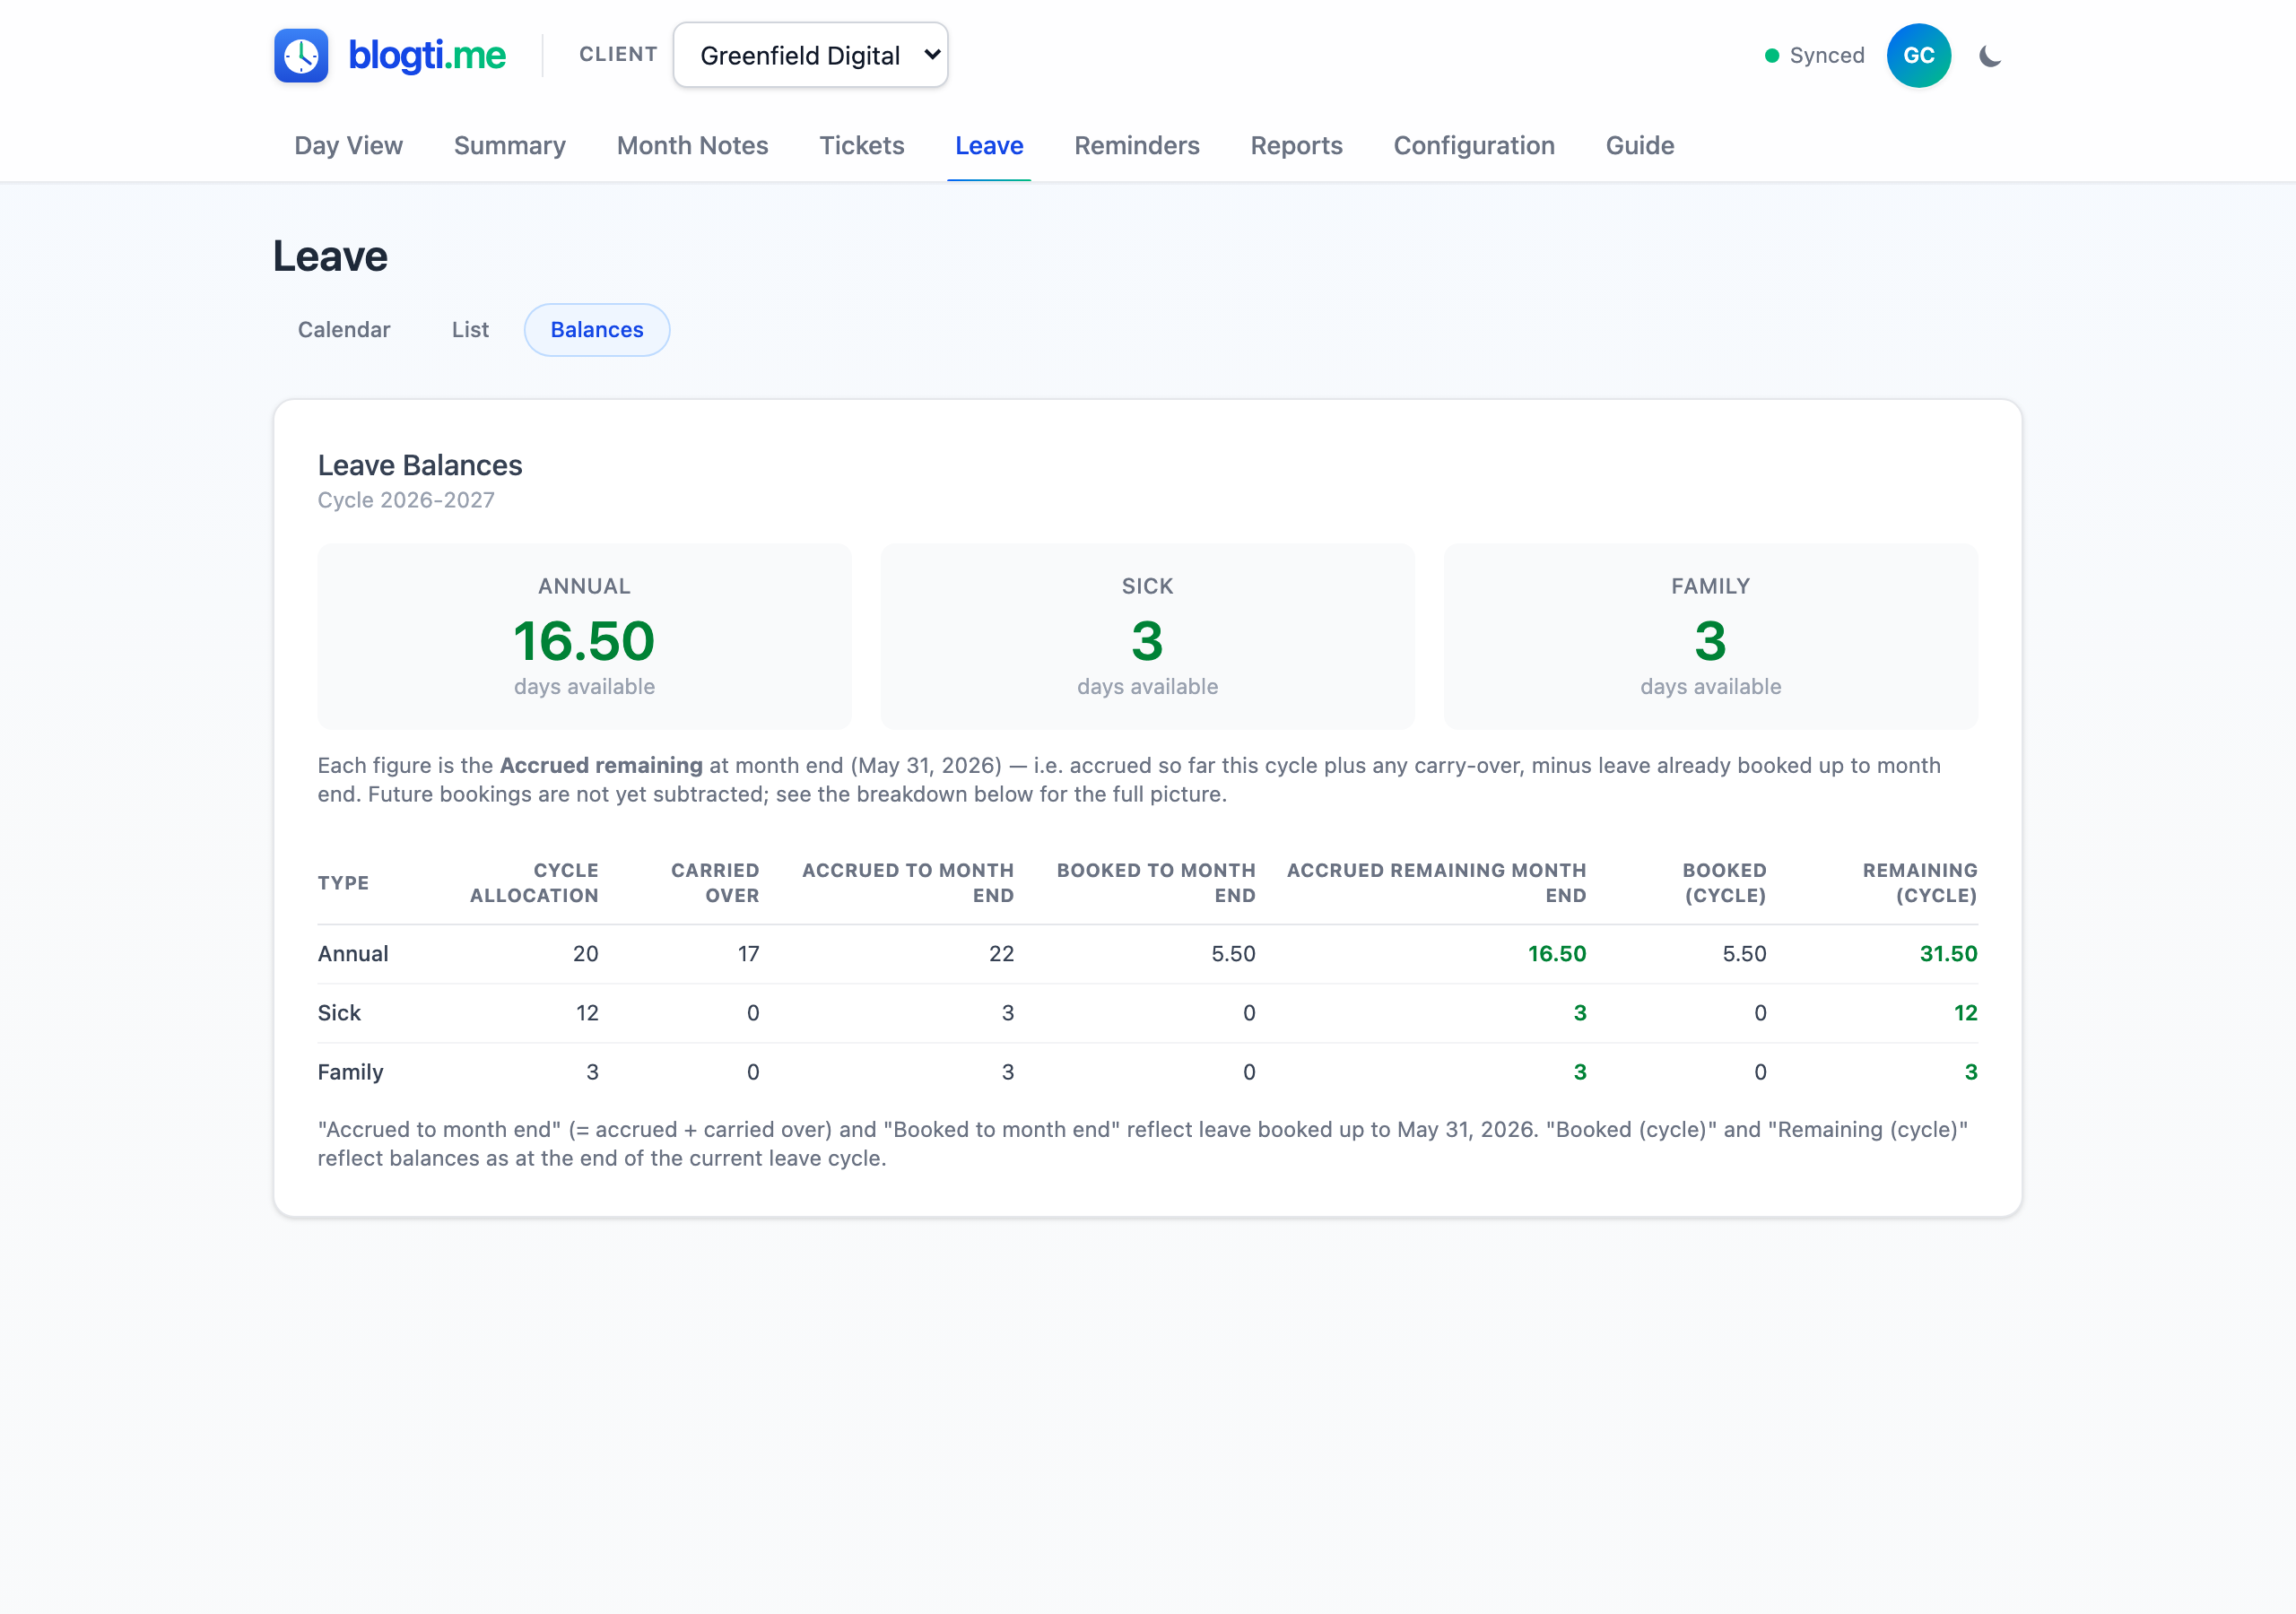
Columns: Cycle Allocation, Carried Over, Accrued to Month End, Booked to Month End, Accrued Remaining Month End, Booked (Cycle), and Remaining (Cycle). Events that straddle the month-end cutoff are pro-rated by intersected working days, so a booking that spans into next month only counts the days inside the period.
Balances are allowed to go negative — if you take more leave than you've accrued, the negative balance is reflected in the table and in generated reports.
Setting Up Leave Cycles
Before recording leave, configure the cycle under Configuration > Leave. Choose the start month (default: March), the first cycle year, and adjust default allocations if needed. A leave cycle is exactly one year, labelled by start-end year (e.g. "2024-2025").
Leave Types
| Type | Default | Accrual | Carries Over? (default) |
|---|---|---|---|
| Annual | 20 days | 1/12 per month | Yes — unlimited (configurable) |
| Sick | 12 days | 1/12 per month | No (configurable) |
| Family | 3 days | Full from day 1 | No (configurable) |
Carry-over Configuration
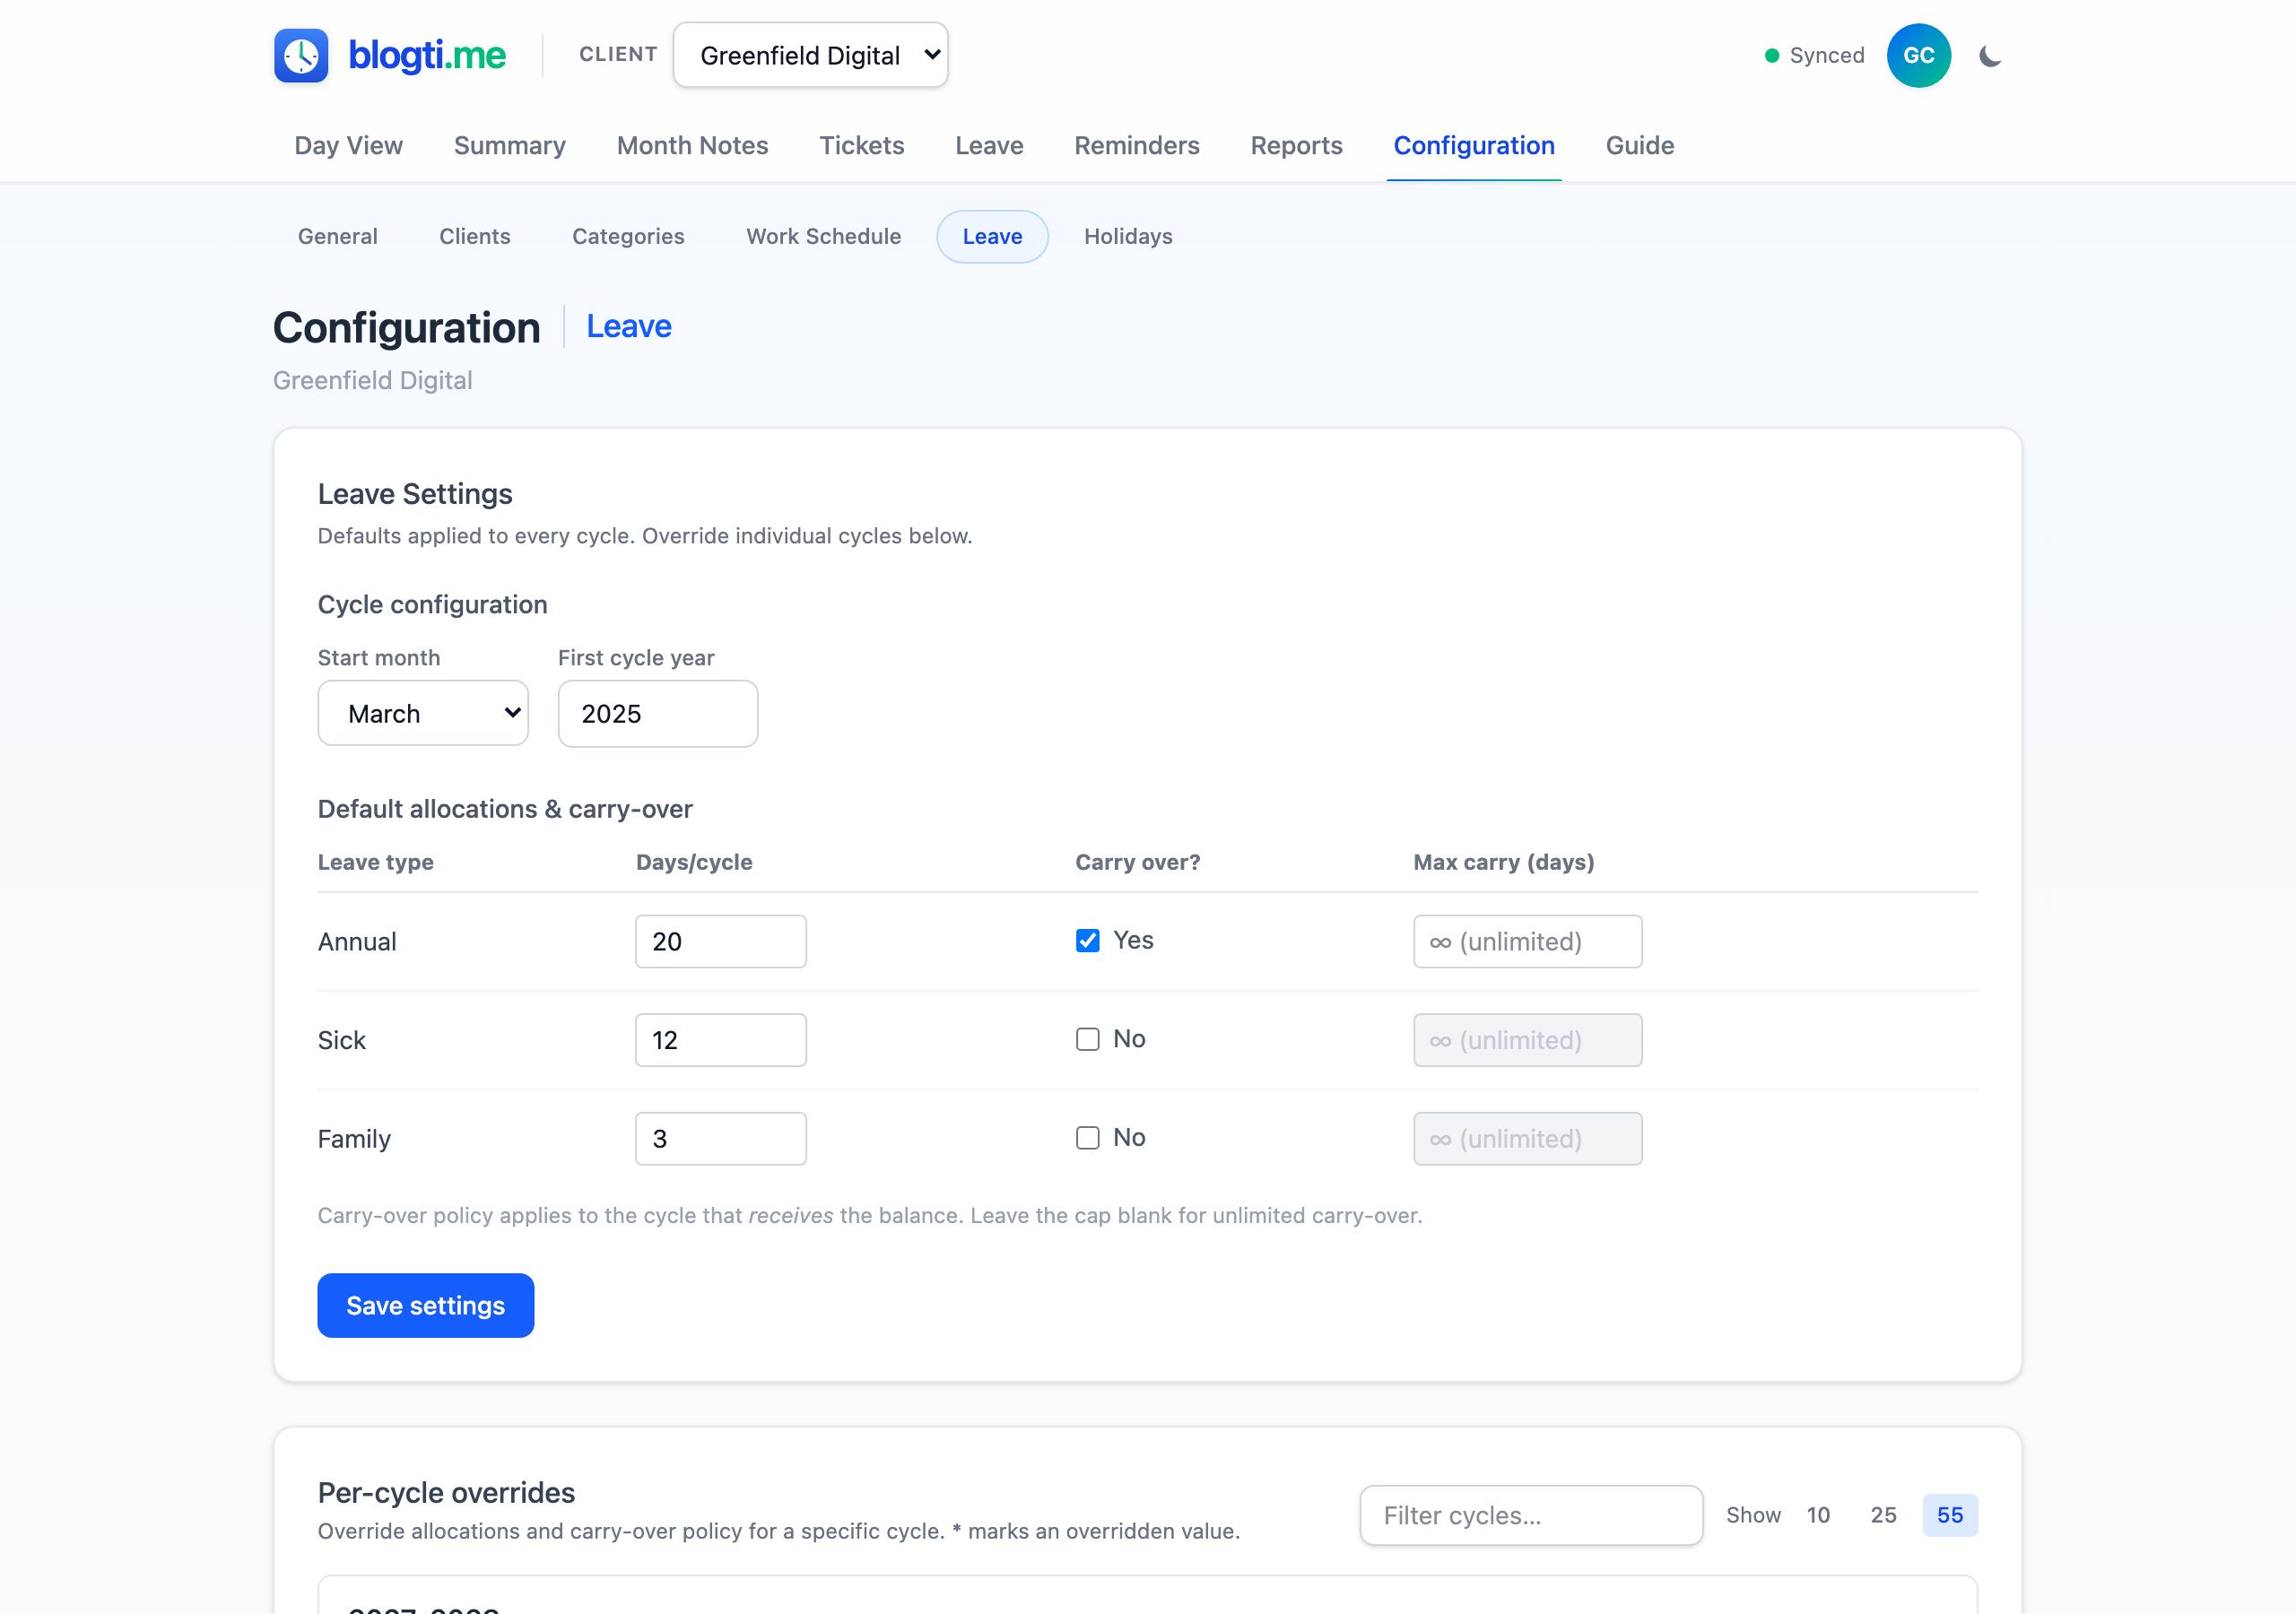
Each leave type has its own carry-over policy, configured in the Default allocations & carry-over table on Configuration > Leave:
- Carry over? — when Yes, the unused balance at the end of one cycle flows into the next; when No, the balance resets to zero.
- Max carry (days) — optional cap on how much carries over. Leave blank for unlimited. Caps clamp positive balances only — overuse always carries through unchanged.
Carry-over policy can also be overridden per cycle. The policy lives on the receiving cycle: the override for "2025-2026" controls what flows into 2025-2026 from 2024-2025. Leave a field blank to inherit the default.
Per-cycle Overrides
Default allocations and carry-over policy can be adjusted for individual cycles on the Per-cycle overrides card under Configuration > Leave. Each cycle is an expandable card — click Edit override (or Add override if none exists) to expand a per-type editor. Leave any field blank to inherit the default. The list supports a search filter and pagination.
Past cycles are read-only by default. Click 🔓 Unlock 24h on a past cycle to enable edits for 24 hours (or 🔒 Lock now to re-lock early). Unlock state is local to your browser and is lost on page refresh.
Public Holidays
Public holidays are excluded from working-day calculations in leave forms and timesheets. Navigate to Configuration > Holidays to manage them.
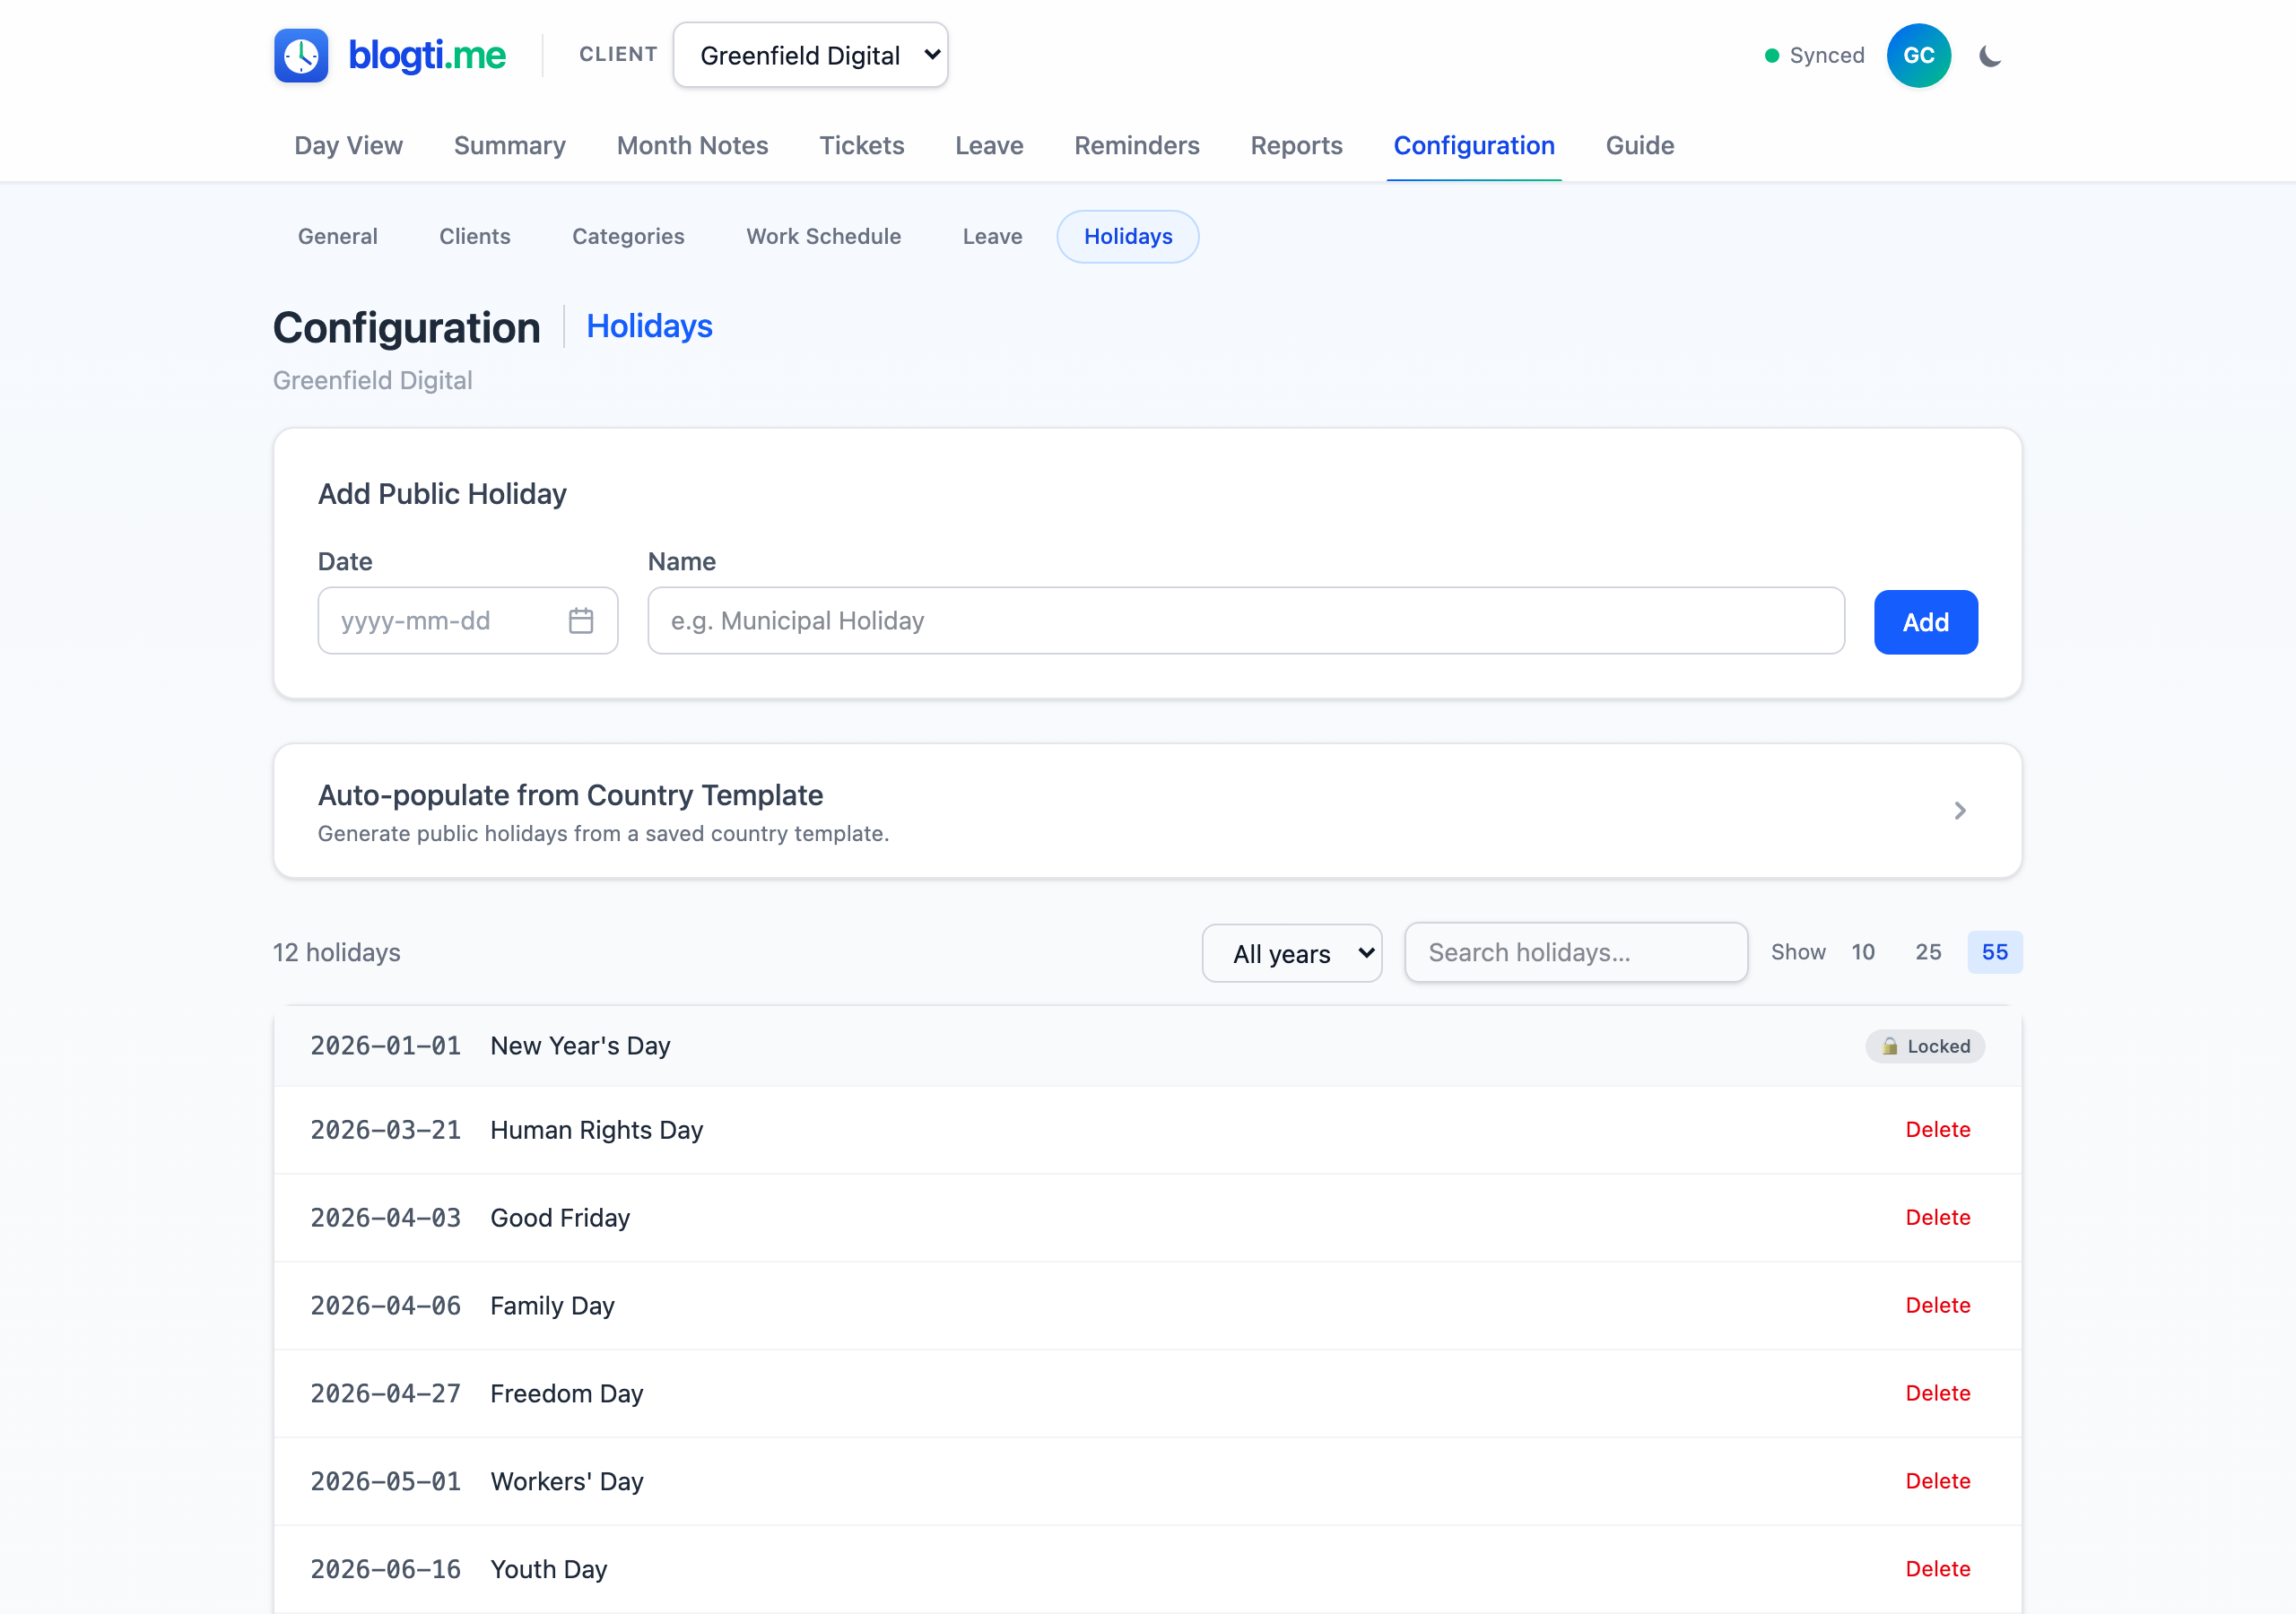
Adding Holidays Manually
Select a Month and Day, enter the holiday name, and click Add. The year comes from the shared year selector at the top.
Auto-populate from Country Template
Expand Auto-populate from Country Template, pick a saved country, pick a year, preview the generated dates, and confirm. Country templates are managed in Configuration > General > Holiday Templates — seed defaults cover 28 countries (SA, US, GB, DE, CA, AU, and many European and Latin American countries) and you can add your own rules. Each run replaces all holidays in the chosen year for that client; any holidays you added manually for other years are untouched.
How Holidays Affect Leave
When you add, remove, or auto-populate holidays, the day count for any affected leave bookings is automatically recalculated. Half-day status is preserved.
Month Notes
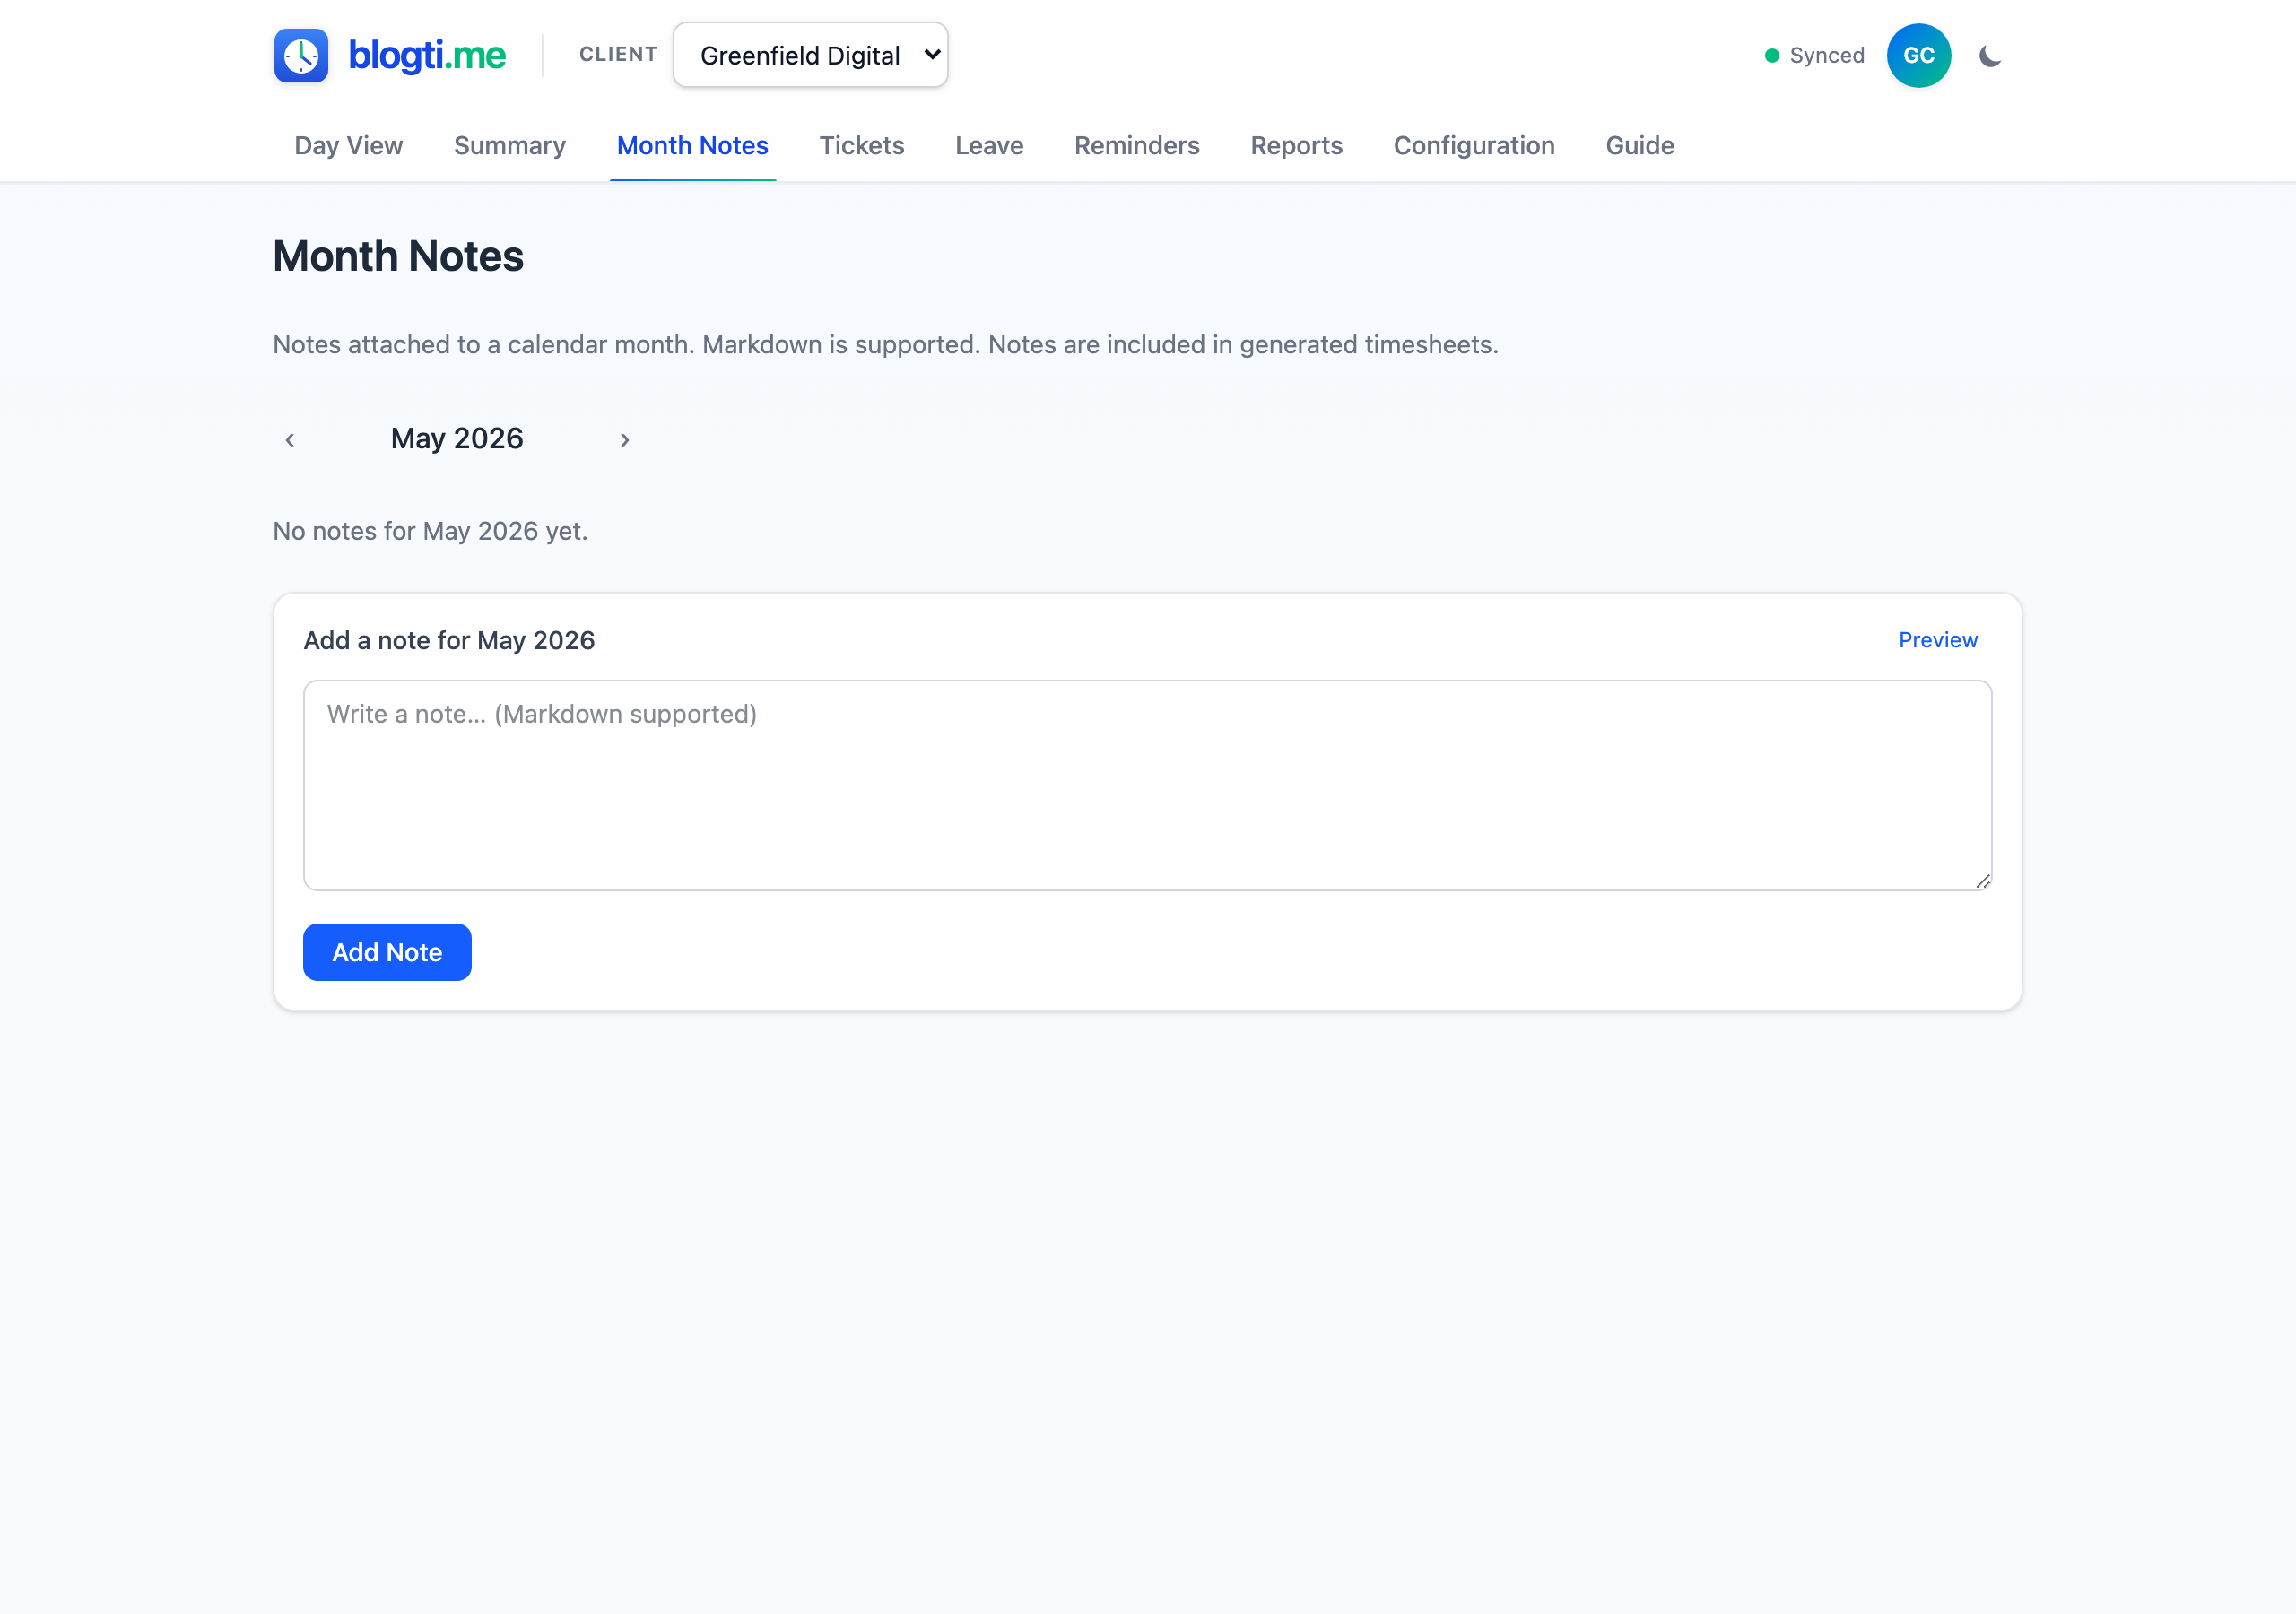
Month Notes are free-text Markdown notes attached to a specific month. Use them to record context, agreements, or comments. Navigate months using the arrows, then add or edit notes. You can add multiple notes per month.
Month notes are included on the closing page of generated Timesheet PDFs.
Reminders
Reminders are date-based nudges — things like "Submit timesheet", "Chase invoice PROJ-47", or "Review leave balance". They live on the top-level Reminders tab and surface inside the app whenever something is due.
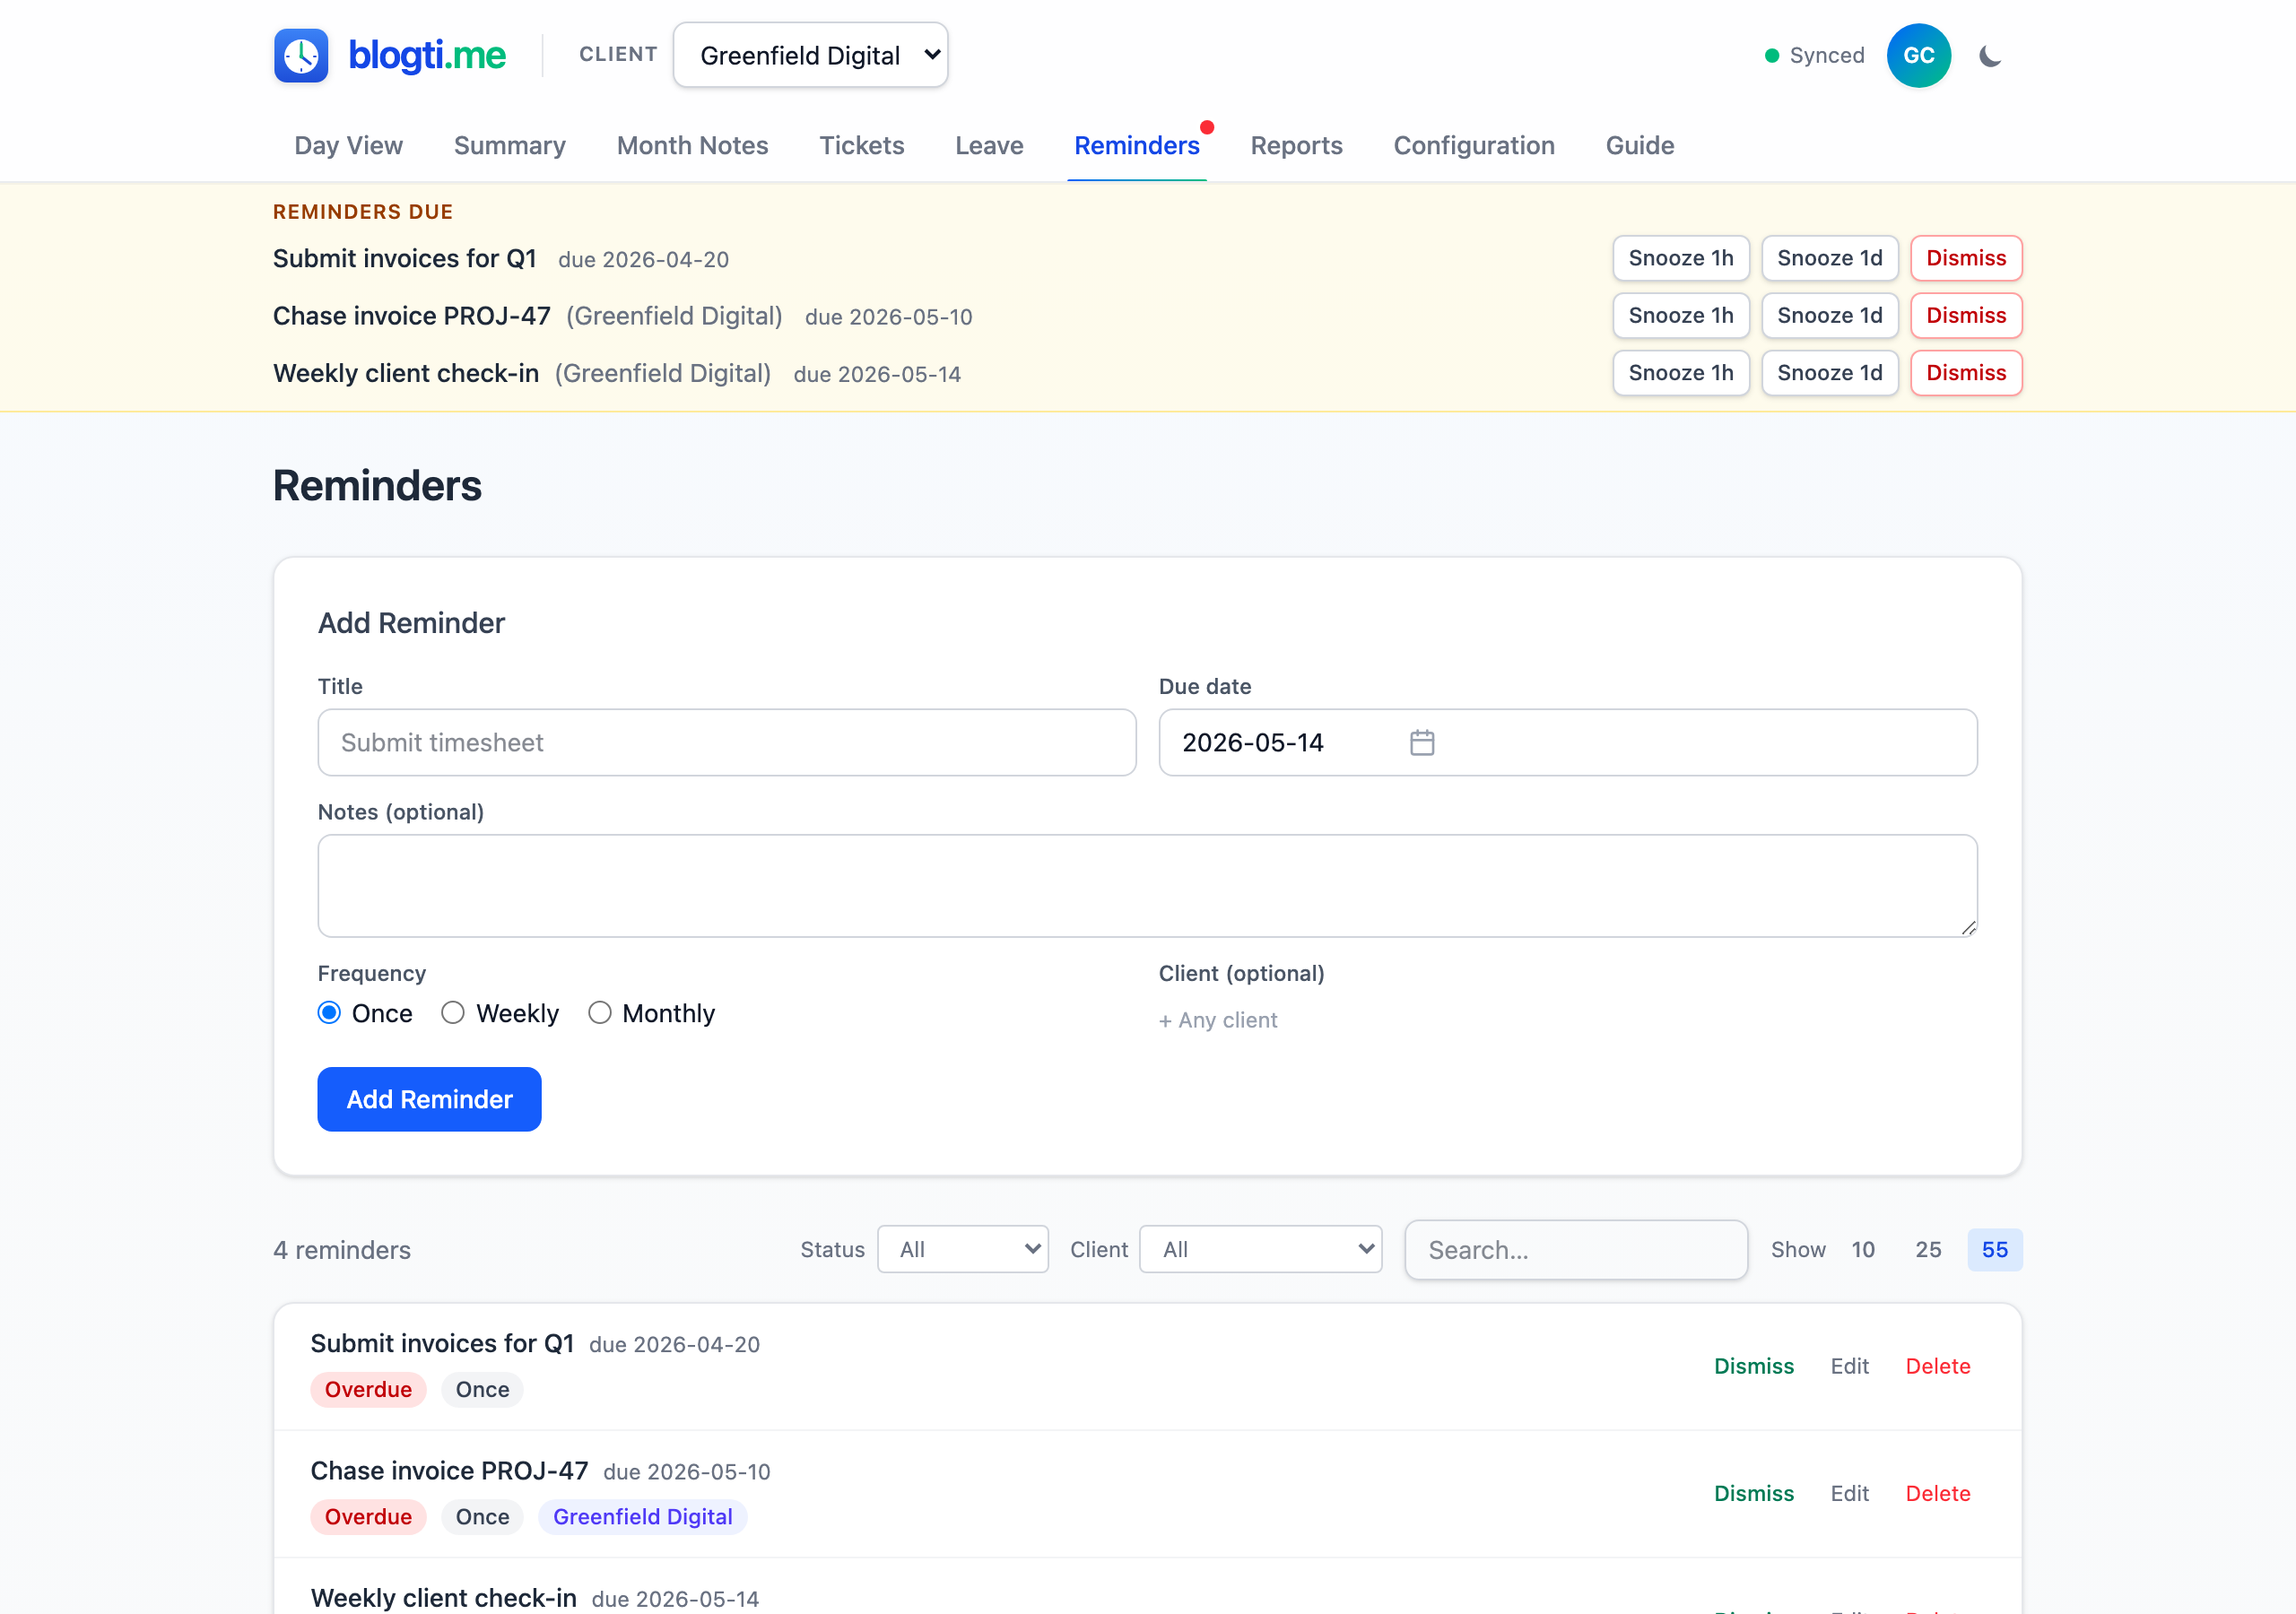
Adding a Reminder
Fill in a Title and Due date, optionally add Notes and a Frequency (Once / Weekly / Monthly), and optionally tie it to a specific Client. Client-scoped reminders show a coloured badge; unscoped reminders apply everywhere.
Reminders are user-scoped, not per-client — they follow you regardless of which client is selected in the header.
Frequencies
- Once — fires on the due date and disappears when you dismiss it.
- Weekly — when you dismiss it, the due date rolls forward 7 days.
- Monthly — when you dismiss it, the due date rolls forward one month (with an end-of-month clamp, so the 31st of January rolls to the 28th/29th of February).
Recurring reminders use a single row that keeps advancing — you don't end up with a history of every occurrence.
Due Reminders Banner
When a reminder's due date arrives (and it isn't snoozed), a banner appears at the top of every page listing up to three due reminders. Each banner entry has three buttons:
- Snooze 1h — hide it for an hour, then it reappears.
- Snooze 1d — hide it for a day.
- Dismiss — two-step confirm; for Once reminders this soft-deletes the row, for recurring reminders this rolls the due date forward.
If more than three reminders are due, a +N more link jumps to the full list. A red dot on the Reminders nav pill flags that you have due items.
Managing from the Reminders Page
The Reminders tab lists every reminder with search, status filter (All / Due / Upcoming / Snoozed), optional client filter, and paging. Each row carries a status pill (Overdue, Due today, Upcoming, or Snoozed until …), a frequency badge, and an optional client badge.
Per-row actions: Dismiss (two-step confirm; same behaviour as the banner), Edit (inline form to change title/notes/due date/frequency/client), and Delete (two-step confirm; soft-delete, unlike dismiss-on-recurring).
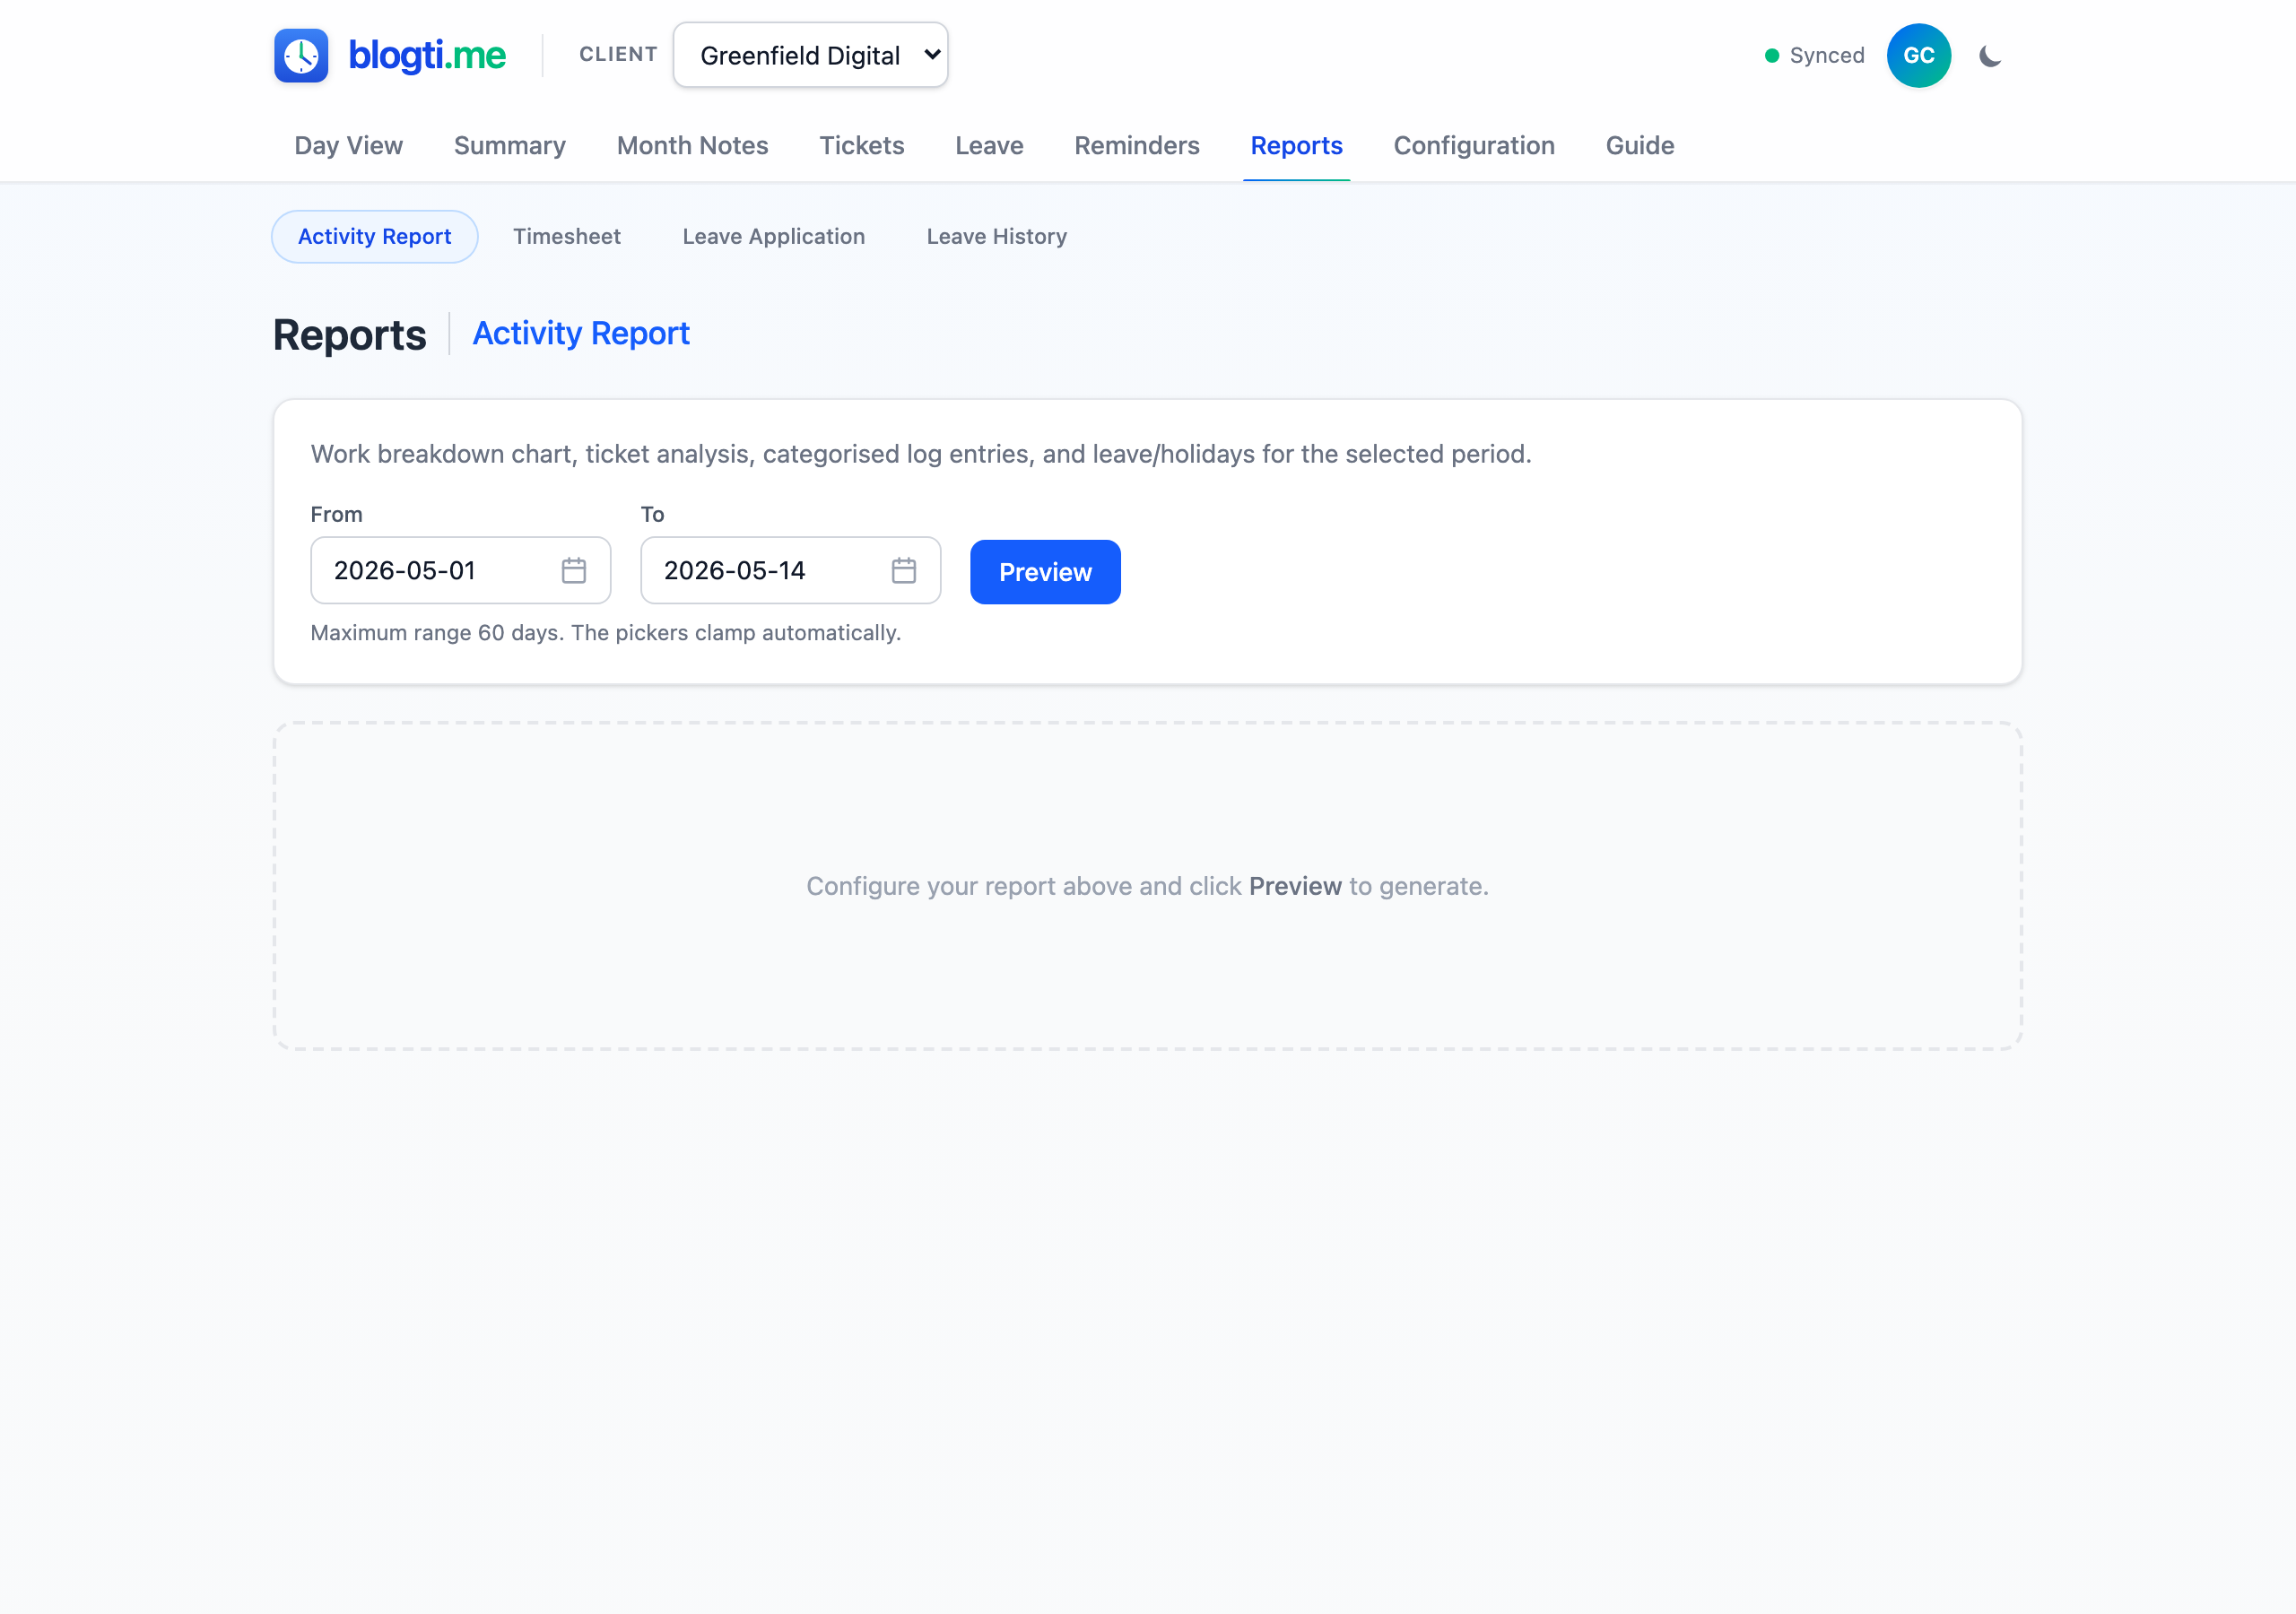
Reports
Generate professional PDF reports from your logged data. Four report types are available, each on its own tab.
Example reports
Download a sample PDF for each report type — generated from the demo client's data so you can see the layout, charts, and tables before producing one of your own.
Activity Report
A detailed analysis of your logged work over a custom date range. Pick a From and To date (defaults to the first of the month through today), then click Preview.
Maximum range: 60 days. The date pickers clamp automatically — for longer analyses, generate several reports.
Includes:
- Work Breakdown — 100% stacked bar chart of billable time per category, per day.
- Ticket Breakdown — heat map of top 10 tickets (when tickets assigned).
- Ticket Coverage — ticketed vs unticketed time per day.
- Focus & Context Switching — bell-curve distributions of session durations.
- Log Entries — table of every categorised message.
- Leave & Public Holidays — overlapping leave events and holidays.
Activity reports carry a purple REPORT badge.
Timesheet
A monthly billing report. Select a Year and Month, then click Preview.
Includes:
- Daily hours table — every calendar day with actual or projected billable hours, holidays, and leave.
- Work Breakdown, Ticket Breakdown, Focus & Context Switching, and Log Entries — same as Activity Report, scoped to the month.
- Closing page — leave bookings, leave balance summary, month notes, and signature panels.
Past months get a FINAL badge; current and future months get DRAFT.
Leave Application
A formal leave request for a specific month. Select a Year and Month (only months with at least one leave booking are listed), then click Preview. Contains a table of leave entries, a summary of total days per type, and signature panels for Consultant, Client, and (if configured) Contracting House.
Leave History
A comprehensive chronological record of all annual leave across all cycles. Click the Leave History tab (requires a leave config), then click Preview.
Includes:
- One table per leave cycle with an opening-balance row, individual leave day rows, adjacent non-working days (weekends and public holidays), and a closing-balance row. Continuous off-time periods are grouped with coloured accent bands.
- A Summary table at the end, with one row per cycle plus a bold Total row. The Total row's remaining balance reflects the current remaining balance (from the latest cycle), so carry-over caps are honoured.
- Signature blocks at the bottom of the report.
Future leave bookings are excluded from all calculations — the report only reflects leave that has already started as of today.
Previewing and Saving
Click Preview to render the PDF in an embedded viewer. A toolbar above the preview shows the filename and a Save button to download the file to your computer.
Letterheads and Footers
Upload letterhead and footer images via the Configure panel on Configuration > Clients. These appear on every page of every PDF generated for that client.

Example letterhead

Example footer
How Time Calculation Works
Understanding how blogti.me computes time helps you get accurate results.
| Scenario | Time allocated |
|---|---|
| Message followed by another message | From this message's timestamp to the next message's timestamp |
| Last message of the day (today, day not over) | From the message's timestamp to the current time |
| Last message of the day (past date) | From the message's timestamp to end of day (23:59:59) |
| Message with no category assigned | Not included in any time total |
Dark Mode
Toggle between light and dark themes using the moon/sun icon in the header. Your preference is saved in your browser and persists across sessions.
Offline Support
blogti.me can work offline for clients where you've opted in:
- Go to Configuration > Clients.
- Enable the Offline toggle for the client you want available without internet.
- The app caches that client's data locally in your browser.
When offline, you can continue viewing data and posting messages. Changes are queued and automatically synced when your connection is restored. The sync status indicator in the header shows whether you're online, offline, or syncing — its tooltip surfaces a Discard pending changes button whenever there are queued ops you'd like to drop without sending.
If queued changes sit unsent for more than 24 hours, a red "Pending changes haven't reached the server" banner appears above every page with two options: Discard (two-step confirm — drops the queued ops and rolls back their optimistic UI effects) or Remind me in 24 hours (snoozes the warning so the banner reappears the next day if the ops still haven't drained). Nothing is ever auto-dropped — the queue keeps retrying until you act.
Recent 90 days by default. The app loads the last 90 days of messages upfront to keep things fast. Navigating to an older month fetches the missing data in the background while you're online. If you're offline on a day outside that window that you haven't visited yet in this session, the day view shows "Older messages — connect to load" instead of appearing empty. Categories, tickets, leave, month notes, and public holidays are always fully available — the horizon only applies to messages.
Tips and Best Practices
Post messages as you go
The most accurate tracking comes from posting a quick note each time you switch tasks, rather than reconstructing your day later.
Use categories consistently
Settle on a set of categories that match your billing or reporting needs. You can always hide categories later when they're no longer relevant.
Block-book completed work
Finished a focused session and forgot to log it? Use block booking to record the whole block at once instead of creating separate start/end messages.
Assign tickets for granular tracking
Need to report against specific work items? Link messages to tickets. The activity report's ticket breakdown and heat map provide powerful insights.
Review the day summary
Before ending your day, glance at the sidebar to make sure all messages have categories and the totals look right. Uncategorised messages (white background) are easy to spot.
Set up holidays early
Configure public holidays at the start of the year, or auto-populate from a country template. This ensures leave day calculations are correct from the start.
Add month notes for context
Record agreements, projected time notes, or context for your client reviewer. Month notes appear on the closing page of generated timesheets.
Export clients for backup
Periodically export your client data as a JSON snapshot. This gives you a portable backup independent of the cloud.
Use dropdown search
With many categories or tickets, type in the dropdown search box to filter instantly. Press Enter to pick the first match without reaching for the mouse.